Tuesday, August 31, 2010

Away From Home, and Back Again... and Smashed Banana Muffins

You may or may not remember that the first real trip I took without the Boy-O since his birth (now 4 years ago) was in January. This weekend I was able to go for another weekend alone, and went to see E in Boston, where she has lived for about the last 13 years. I used to visit her more frequently, but due to motherhood, have left the bulk of visitation up to her. I had yet to see her new home, and a experience a whole new view of Boston, a city that changes my perception of it each and every time I visit.

Most of this city-changing phenomenon is due to E's amazing ability to be the best hostess and tour guide imaginable. In my wildest dreams could I rival her for providing comforts and conversation... and she is one of the people that I love most in life. She exudes calmness, when I sat at her dining room table after my arrival and felt twitchy that I wasn't moving around, and somehow it can spread to everyone who knows her. I never go to visit her with any set expectations or sights to see, and yet every time I have, every imagined notion has been smashed to bits, and I get inspired to pieces. She's lived in a few different neighborhoods as well, and neighborhoods on the East Coast actually are different worlds compared to the roughly drawn areas we call neighborhoods in Milwaukee.

Larger cities have amenities that my own little old town could only dream of. Corner restaurants instead of corner bars, and hugely diverse ethnic populations bringing with them every conceivable ethnic grocery store. I'm not slighting my city mind you... I love nothing more than coming back home after all. But three days in another world is sometimes really just plain wonderful.

Some highlights:


A little cheese shop in the South End, where I didn't even need to eat (but did have a few cheese samples). I was visually gluttonous, and I was graciously cleared to take photos by the nice man stocking sparkling water, even though I totally interrupted his work day seeing the store was barely big enough to turn around in. Maybe unfortunately, this was the least of my eating.


I am not a habitual over eater. I actually hate being so full that I'm uncomfortable, no matter how delicious the dinner is at the time. The funny thing is, I totally overate every single day of this trip. E is the same way. She is a healthy eater and a great cook, but somehow the combination of joint visitation and too many good Groupons led to too much indulgence on more than one occasion. I didn't take photos of the amazing dinner we ate late Friday night at Shanti, an Indian restaurant where I tried a naan with coconut and chopped nuts. I've looked up a (similar) recipe, and I have to try making it as soon as I get a little free time. I'm still daydreaming about some onion type chutney I ate there as well. I need to eat more Indian food, this much is clear.

On a tip from some women I sat near on the plane on the way over (foodies and organizers for FarmAid, no less, which is going to be held at Miller Park this October), we ate lunch on Saturday at Meyers and Chang. E had heard of it, but never ventured there. I was so excited! First off, it was gorgeous. Asian and pink, modern and glossy, tiny postage stamp tiles around the floors that graduated in colors. It felt bright and delicious, and that was before we ordered. Second, they only were serving dim sum due to the time we got there. I've never had dim sum (a great related post by Glutster, on his birthday dim sum experience here...), but always wanted to try it. I'm a fan of small plates and sharing food, and while this was a bit more modern and not as traditional, it was delicious and very well prepared.


Pork and Lamb Bao-type buns.

Align Center

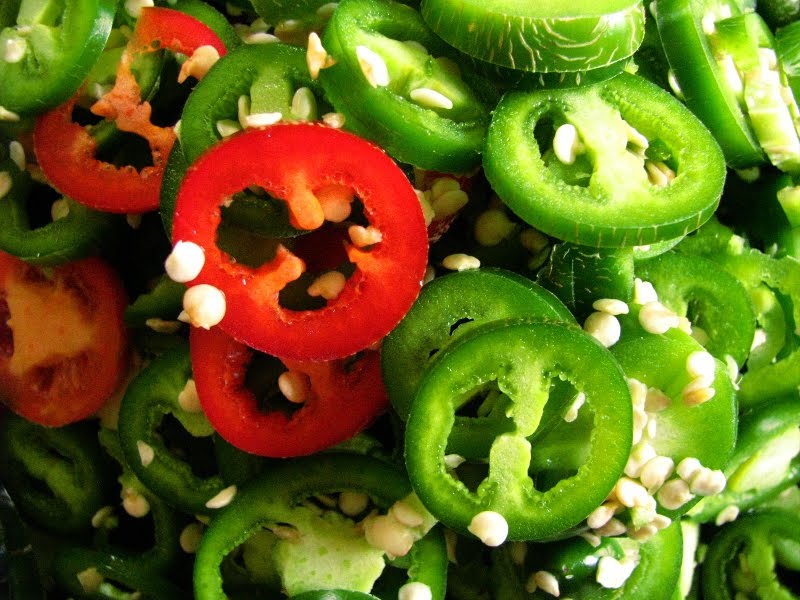
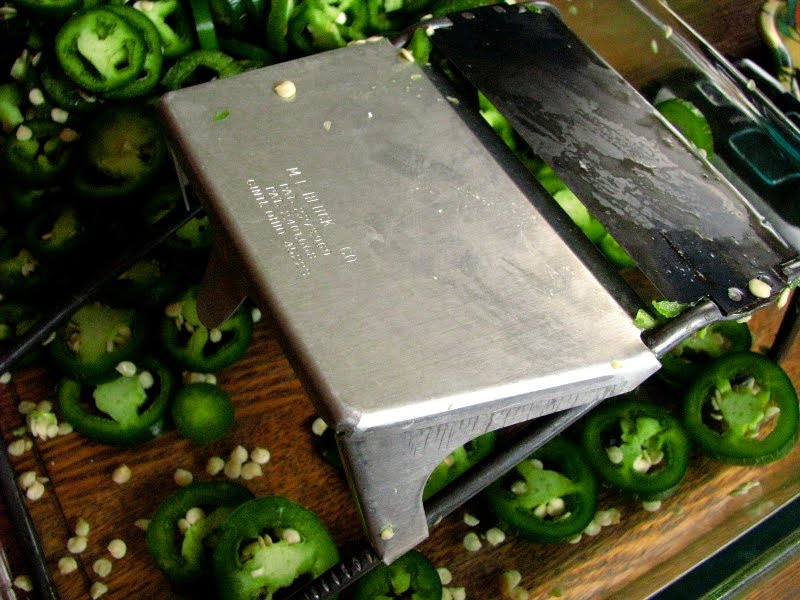
We got the pickled veg plate to start... which was so delicious. Pickled jalapenos, mysteriously missing their brutally hot center seeds and membranes (I should have thought to do that before I canned mine), kimchi, pickled celery, carrots and underneath a beautiful bed of bright pink pickled daikon radish which was my favorite. Now I want to lacto-ferment all kinds of things, and figure out where to find daikon radish around here since it in particular was so good.


...and I also got to be envious of E's new Canon. I got to take pics with it to try it out. Suddenly, I want a new camera...

If Meyer's & Chang is billed as a "funky indie diner", then the Agawam Diner is the quintessential American diner experience. Sunday morning, we went to the flea market at Todd Farm, close to this diner that E remembered years before I had wanted to visit. It was due in part to this article in Saveur I had read, and due to Barry Levsnson's film (which admittedly doesn't really revolve all too much around the eatery, but is more of a love letter to East Coast culture in the '50's).

The Agawam was everything I thought it would be:


A classic car diner, still serving original homemade food after all these years. We were hot and hungry and over ordered. We both had the Chicken Pie special, which came with coffee and soup (for $8.95), then augmented with a chocolate frappe, which we split, just in case we thought we would still be hungry, two pieces of pie. If you think I was full, it would be an understatement. I was *so* full, I actually took an hour and a half nap when we got back to E's house. Ahhh, vacation.


fish chowder, saltine crackers.

f

Chicken Pie. And cranberry sauce from a can! No where else would I have been so excited! (I also remembered that Marisa at FoodinJars canned up a version sans corn syrup... hmmmm - I may now know what my next canning project will be, and maybe even in the beautiful Weck jelly jars that E gave me for my birthday!) I couldn't finish, however, since while at a diner, I had to save some room for pie:


I ordered blueberry, and E had the coconut cream. Both were delicious. I don't think I've eaten a piece of blueberry pie since I worked for the GOP, and hers was delicious. Our waitress called E "honey bunny", and was everything you would want in a waitress in a real diner. She brewed a new pot of decaf for E, since the old one didn't look so hot, and you can just know that she is that friendly and genuine with everyone - it's not some kind of "diner waitress behavior" that you would expect after pining for years over such movies as (Diner), Back to the Future and Waitress.

Part of the reason I had such a great time, is that my friend E is the best. She loves food and hates being caught in situations where travel and wander to lead to eminent starvation, and worse, to the purchase of less than worthy food. She always packs a snack, this time it was smashed banana muffins and a few dates. The muffins aren't actually smashed, nor do they make you smashed, but they contain bananas that are smashed and are themselves just plain smashing.

It was so hot outside that when I really needed one (or maybe I just really wanted one...), it felt like it was just pulled out of the oven. Sometimes, muffins just taste better when someone else makes them for you, and then packs them up tenderly, just so that you feel special when you tuck in to eat it. I ate one in the sun on Saturday, and another on the plane yesterday: a blurry eyed early Monday morning, when it tasted even better and was the best reason to not even think twice about ditching the packaged "biscotti" that was the bitter reminder of the demise of the airline industry.

E emailed me a few of the recipes I ate at her place (when we weren't (over)eating out...), and she included this one for banana muffins. I know everyone has at least three muffins that they like to make when the black blotchiness overtakes their fruit on the counter, and I usually never make the same version twice. In classic rcakewalk fashion, I've already altered her recipe, but I'll include her original. I need to find out if she intentionally leaves out the egg, or if she forgot to type it in, but I added one - just because I wasn't feeling particularly vegan today.


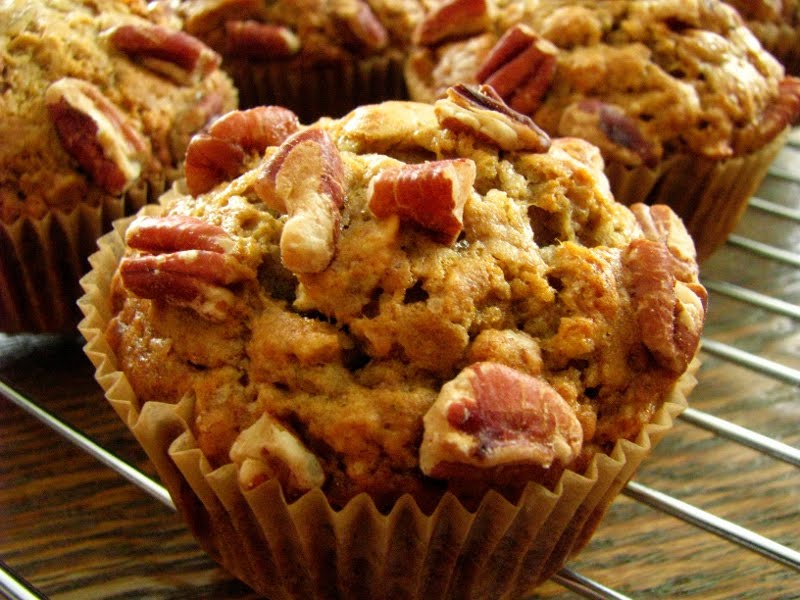
E's (Smashed) Banana Muffins
  • 1 cup flour (I used 3/4 c. whole wheat and 1/4 c. AP flour)
  • 1/2 cup rolled oats or quick oats (I used rolled oats)
  • 1/3 cup sugar (I used raw sugar)
  • 1/2 tsp. salt
  • 1 tsp. baking soda
  • 1 tsp. vanilla
  • 1/3 cup canola oil (I used coconut oil, melted)
  • 2 smashed bananas
  • walnuts or pecans for the top
  • (I added one egg)
Preheat oven to 350 and prepare muffin tin for 10 muffins (I got 9 muffins, with my handy scoop). Combine wet and dry ingredients in separate bowls, then mix together. Fill 10 muffin papers and sprinkle tops with nuts. Bake 25-30 minutes.

Enjoy! ~e.

Enjoy I will, and Boy-O ate 2 straight out of the oven this afternoon! This from a kid who actually gagged the last time I firmly suggested he eat at least one bite of banana...

Being away from home always makes me so happy to be back. I love having a little time to myself, but since my life has changed so much in the past 5 years, I love more the feeling of inclusion in my own family. I may stress out over the day-to-day food consumption of my son, or over the societal detriments of the quickly upon us football season, but I do love my family, I do love my home, and I love spending most of my time in my kitchen. Self imposed work? Yes, but the best and most rewarding kind for me.

Maybe when he grows up, my Boy-O will learn to cook, so that he can impress someone or that he won't starve when I can't take care of him. He starts school the day after tomorrow, my birthday - a cruel reminder that I cannot stay young, no matter how young I feel. I clearly remember going to school for the first time, and I remember all the lunches my Mom packed for me when I didn't stand in line to have my little yellow lunch card punched to eat in the lunchroom. How did it happen so quickly that I'm in her position? It really is just a vapor.

I know it would drive me crazy to think about time too much, how it flies and how there is never enough of it. How it seems somehow that the past is still happening, the best times I can remember are still just at hand and not so far behind. A series of phases that continually follow me around, from what to eat for dinner, to where to go on vacation. I am fortunate to have a few close friends like E, people that seem constant and unchanging, even though I know everyone is actually changing all the time. People you know you can count on no matter what, and through whatever life can throw at you. I'm so lucky for my family, but lucky also for great friends.

Friday, August 27, 2010

Baked Alaska: Daring Baker's Challenge August 2010

The August 2010 Daring Bakers’ challenge was hosted by Elissa of 17 and Baking. For the first time, The Daring Bakers partnered with Sugar High Fridays for a co-event and Elissa was the gracious hostess of both. Using the theme of beurre noisette, or browned butter, Elissa chose to challenge Daring Bakers to make a pound cake to be used in either a Baked Alaska or in Ice Cream Petit Fours. The sources for Elissa’s challenge were Gourmet magazine and David Lebovitz’s “The Perfect Scoop”.


I really enjoyed Elissa's choice of challenge this month. Baked Alaska. I've never eaten it, or really even seen it. It fell into the category of "Floating Islands" or "Turkish Delight", impossibly romantic notions of desserts that I also have neither made or eaten. Their names alone could comfort you during the darkest hours, a nursery tale feast all too easy to conjure when such a beautifully named sweet is involved.

This baking experience was the inaugural event in which I did not use any granulated white sugar when called for. When I was visiting with my Parents a week ago, we shopped at an Amish "Bulk Store". They sell all sorts of nuts, seeds, soap making supplies, flours, any other homesteading staple you could imagine. It's refreshing to shop in a simple environment, the size of one's living room. It kind of reminded me of the little hole-in-the-wall co-ops that used to pop up here and there before the era of "food shopping as art" concept stores emerged. While I can (and like to) be seduced by the best in floor displays, I loved this Amish Bulk Store, and my Mom and I decided to split 50 pounds of raw sugar.

We divided it into 14 quart size canning jars each, and when I returned I weighed a cup to see the difference from granulated sugar. A regular cup of white sugar is about 8 ounces, and the raw sugar was about 6. When we asked various Amish women about the usage, some preferred to use more, and some less than the same amount of white sugar. I still have a lot of practice ahead of me, but I like the flavor so much better, that I'm sure it will be fun experimenting. (When I used the raw sugar recently for canning, I used a weight measure based on the 8 oz. per cup of granulated to keep with the result of the tested recipes.)


The brown butter pound cake recipe we were supposed to use did not work out for me. I made it according to the weight measures, and I don't think the conversion for the flour was proper. I had a rather flavorless, butter soaked cake that was on the leaden side. Since the cake is really just a thin layer on the bottom, I probably could have used it - but since these desserts were for Maeckel's birthday, I decided that I had to make it again. It was the correct choice!


The second time, I used a Cook's Illustrated recipe from my well worn copy of The Best Recipe. I altered it by first browning the butter, then weighing it and adding enough regular butter to bring it back up to 8 ounces. I also let the butter come fully to room temperature. I baked it up in a loaf pan, and it was delicious. I saved all the scraps from cutting out little circles for the bottom of my Alaskas, and on Lo's advice am going to make a peach ice cream (Alton Brown's Burnt Peach Ice Cream... or maybe I'll even give David Lebovitz's Peach Ice Cream a try), and add the bits of cake in.


Meanwhile, David L's salted caramel ice cream is probably the best ice cream I've ever made at home...

Instead of the recommended David Lebovitz vanilla ice cream, I made his salted butter caramel version. Other than a (by comparison) light recipe for vanilla ice cream, I have never made any Lebovitz ice creams in the past. I think by making this one recipe it is completely evident that he sure knows what he is talking about. This ice cream was so smooth and seductive, you could almost believe that it in no way could have a negative impact on your health. If an ice cream could be sexy, this would be the one.


If there could be a downside, it was that the ice cream was so soft that I knew that even a brief baking at 500 degrees was going to cause it to melt quickly into nothingness. I used this excuse to purchase a culinary torch. I got one from Superior Equipment and Supply, a restaurant supply that is actually walking distance from my house (lucky me...). I am now one of the people now getting perhaps a bit too excited that I can wield an 1100 degree flame in my hand! It worked really well, no messy ice cream, and even time to take pictures! I can't hardly wait to see what I can "torch" next...


Prior to torching.

The only thing more fun than taking out little plates of frozen desserts to torch, was eating them. They were delicious. The meringue pipings tasted like toasted marshmallows, the salted caramel ice cream was still firm and just a little melty, browned butter pound cake was a bit hard, but softened up nicely by the time we got to the end of the dessert. Just in time to taste all of the browned butter goodness and pretend that we didn't want to opt for seconds.

I will certainly be making this again! It's a great idea for dinner parties, since they are done up in advance and then only torched slightly before serving. If you use a hard set ice cream, I'd bet you may be able to get away with the namesake "Baked" part of the Alaska as well. A version I'd like to try on my next go would be in the s'mores realm - a base of homemade graham cracker, a bit of dark chocolate ice cream and this meringue toasted deeply: sounds completely addicting to me.


You can find the recipes for this month's challenge at the Daring Kitchen website... and be sure to pop over and take a look at 17 and Baking. Elissa has a beautiful site filled with great photography and delicious baked goods.

After I missed last month's challenge due to being so busy, it felt extra good to be obsessing again about a challenge for August. I'm so glad that I made the time to make this dessert. Thanks again to Elissa for a great challenge!


(Kinda makes you want to curl up and re-read the Chronicles of Narnia, doesn't it?)

Monday, August 23, 2010

Cortido: My First Experiment with Lacto-Fermentation

I actually intended to make a vegan (even raw vegan) version of this recipe this morning to continue on in my Vegan Monday postings, but that's just not what ended up happening. I was finally able to catch up on a little bit of reading yesterday afternoon, and read this post by Mostly Foodstuffs. Deena is so right in her observations that her dog has abandoned toys that go untouched until another animal decides it's play-worthy. I don't currently have a dog, but I know it sure works the same with children, and also with me in the realms of bookmarked recipes.


I've had this raw vegan recipe earmarked for awhile now, after I first saw it on the website Finding Vegan. I love vinegar, I love cabbage, I love things that can be eaten on everything... I then knew I would love this recipe. Healthy Green Kitchen added apple, kale and vinegar to Sally Fallon's original version that was published in Nourishing Traditions. This book kind of has the "dog toy" effect for me. I have the book, I've paged through a great deal of it (though haven't read it cover to cover), but until I actually see the end result made by someone else, or taste it, like I did at Annie's class, it is a book that wrongfully often slips my mind.

Sally's version includes whey, which isn't necessary but does kick-start the process. Since I've been having a steady harvest of whey, in the end I opted to let the whey do the inoculating rather than make the vegan vinegar version.

According to Fallon, cortido is originally an El Salvadorian ferment made with just a few ingredients, traditionally including pineapple vinegar. While I certainly want to try making pineapple vinegar sometime soon, I opted for the "quick" approach that didn't use any vinegar. Just a 1/4 cup of whey and a tablespoon of salt, and all the liquid needed to keep the cabbage completely submerged was naturally produced.

My favorite part of the whole process was beating the mixture with a spoon for a full 10 minutes. I rather like when kitchen work starts to feel aerobic, it makes me feel like I'm being extra healthy.


Before I added the red jalapeno...

My version of this ferment is different from both the Fallon and Healthy Green Kitchen versions in that I had to add more heat. I am positively addicted to spiciness, and tend not to be happy unless at least part of my day's meals causes my tongue to burn, or preferably, my eyes to sweat. I used the leftover half of a hot, green wax pepper that was in the CSA box last week and a whole, overgrown red jalapeno, in addition to adding the full recommended amount of red chile flake. I wanted to add garlic, really bad. But, I decided that I add garlic to everything, so maybe I should lay off in this instance. It's good, my friends, and it's only been fermenting for the morning. I can't wait until it ages in the fridge...

Fallon's recipe yields 2 quarts, but I got slightly less. Just pack tightly into clean, glass jars, to within about an inch of the top.

Cortido (adapted from Sally Fallon and Healthy Green Kitchen)
  • 1 large cabbage, cored and shredded
  • 4 smallish carrots, sliced
  • 1 large onion, sliced thinly
  • 1 T. Mexican oregano
  • 1/2 t. red chile flakes
  • 1 T. sea salt (I used Celtic Grey Salt)
  • 1/2 of a hot wax pepper, sliced
  • 1 large, red jalapeno, sliced
  • 1/4 c. whey (Fallon says to use an additional 1 T. salt if whey is not available, HGK uses cider vinegar instead.)
Combine all ingredients in a large bowl or bucket. Pound with a wooden spoon or a meat mallet for about 10 minutes to release juices.

Pack firmly into glass jars (canning jars are best), and press down tightly to release liquid that fully covers all the veg. Leave about an inch of space on top, and screw lids on tightly.

Let ferment at room temperature (about 72 degrees f.) for 3 days, then transfer to the refrigerator. It will keep for a long time.

As Fallon says,
"Lactic-acid fermented vegetables and fruit chutneys are not meant to be eaten in large quantities but as condiments... Some lacto-fermented products may get bubbly, particularly the chutneys. This is natural and no cause for concern. And do not be dismayed if a little spots of white foam appear at the top of the pickling liquid. They are completely harmless and can be lifted off with a spoon. The occasional batch that goes bad presents no danger - the smell will be so awful that nothing could persuade you to eat it. The sign of successful lacto-fermentation is that the vegetables and fruits remained preserved over several weeks or months of cold storage."


Of course, I couldn't help but have a tostada for lunch, topped with newly made cortido! It was made even better with a bit of strained homemade yogurt on top. The Boy-O and I had just got back from the pool, which sadly seems to have closed for the season. Just like that. No warning. Summer is as good as over. Fortunately with such fresh preservation methods as lacto-fermentation, I'll be able to extend my enjoyment of the summer harvest at least for a while. If I go through this version as fast as I think I will, I'll try the Healthy Green Kitchen version next time, though I'll still likely add some more heat. I just can't help myself.


Friday, August 20, 2010

JalapeƱos.


It does seem like awhile since I've sat in the warm glow of the little netbook here... I was out of town, which for me usually translates to "at the farm". My Parents' place about 3 hours west of here is just about as perfect as a respite can be, a gracefully aging (and continually improving) farmhouse with plenty of acreage for a city bred Boy-O to cut his country chops.

Western Wisconsin has had a very rainy summer, so much rain that most of the carefully groomed gardens in the area have been overtaken with weeds, if not been totally destroyed by flooding. Some garden crops in some gardens didn't take, but fortunately for everyone, there are plenty of people willing to swap, share or sell. August in the country is a continual reminder of the bounty of harvest time - and it starts to feel impossible that fresh veg will again be out of reach before we know it.

My Parents planted 8 jalapeno plants, and had a scarce handful of fruit as their yield. I didn't really know that I would be in for 2 days of jalapeno processing, but when you happen to ask, sometimes your dreams can come true. Many of the family farms in the Amish community have taken to opening self-serve and on-your-honor farm stands. Tuesday morning, before heading back to the city, my Mom and I went to one on one of my favorite ridges - Irish Ridge - intent on getting another super sweet watermelon from such a stand. When you have an exceptional melon, you tend to remember where you got it! That is certainly the way of the Amish farm stand. We asked about the pesticide situation, and found that that while not "organic", they didn't spray any of their melons or peppers - and then by accident my Mom asked if they had jalapenos.

Most of the Amish community is just plain amazing to me. Ideology aside, I am impressed and continually aghast at the sheer amount of work they are able to do in a growing season. They have large families, and they can up enough fruit, veg, and meat to last an entire year. Summer's work is usually never an excuse to talk to a neighbor, however, and the slow, quiet way of life seems like something I could get used to real easy. The Amish are unaffected by such trendy ideas as "eating local" and "organic and sustainable" agriculture. Most of them practice these gospels by necessity, and a greater amount of them than I realized are against chemical pesticides and fertilizers.


One peck of sliced peppers: 8 lbs of heat!

When asked how many peppers I needed for canning, I just knew I wanted "a LOT". "Well, how many peck do you want?" An Amish woman asked me, and showed me a box that was the equivalent of one peck. I "erred on the side of gluttony", and said 2 boxes - having no real idea the weight on a peck. She sent a family member out to the garden to pick them as we waited on the side of the road, noting the quiet, the horses, the children scampering who also have a work-minded purpose to their days. My two pecks of jalapenos ended up being 16 lbs of peppers, and here is what I did with them:


Just as I was about to pull out of the driveway, we were talking about slicing that mountain of peppers. My Mom ran back in to get her V-Slicer to lend me. Made of blue carbon steel, the blade is stationary - a dangerous piece of kitchen equipment that she has used ever since I can remember. On scanning the packaging, I love to notice the way that advertising has changed over the years. I can not think of a recent example that would feature a working woman's hands, and the hands of a woman that show a wedding ring, no less. There are a few water spots on the box, but I assure you that the original image does not show the mitts of a 20-something parts model... those spots are hard earned.


The V-slicer did fairly quick work of slicing the peppers, and thanks to their handy stems, I didn't worry too much about the lack of a safety guard. I shielded my hands with non-latex food prep gloves, hoping to avoid the burn of capzasin, but a couple of knocks against the blade and the sterility was breached: jalapeno juice stinging my digits for the rest of the evening, it's warfare reminding me every time I forgot and rubbed my eyes.

The candied jalapenos I made last year were quite a bit different. The process as well as the proportions were different than the recipe I used this year. I used a different recipe primarily because I couldn't find the one from last year, and it turned out to be a good thing. The jars filled more full, and the texture is more akin to the ones I've had commercially from the West Allis Cheese and Sausage Shop. Don't let the canning stop you from making them: if you don't feel like canning, simply fill the jars and keep them in the fridge. They should stay fresh and well preserved for at least a couple of months, probably longer. My yield for a double recipe (6 lbs of peppers) was 7 pints.

Candied Jalapenos (adapted from Foodie with Family, via Tasty Kitchen)
  • 3 pounds firm, fresh jalapeno peppers, washed and sliced about 1/8 inch thick
  • 2 cups cider vinegar
  • 6 cups white granulated sugar

In a large pot, bring cider vinegar and white sugar to a boil. Reduce heat and simmer for 5 minutes. Add the pepper slices and simmer for exactly 4 minutes. Use a slotted spoon to transfer the peppers, loading into clean, sterile canning jars to within 1/4 inch of the upper rim of the jar.

Turn up the heat under the pot with the syrup and bring it to a full rolling boil. Boil hard for 6 minutes.

Using a ladle, pour the boiling syrup into the jars over the jalapeno slices. Insert a chopstick (or a small icing spatula) to the bottom of the jar two or three times to release any trapped pockets of air. Adjust the level of the syrup if necessary. Wipe the rims of the jars with a clean, damp cloth and top with new lids and rings to finger-tip tightness.

Place jars in a simmering hot water bath canner with water to cover the jars by 2-inches. When it reaches a full rolling boil, boil 10 minutes for half-pints (8 oz) or 15 minutes for pints (16 oz). When timer goes off, transfer the jars to a cooling rack. Leave them to cool, without moving, for 24 hours.


I think that adding the sliced peppers to the boiling brine made for a much better end result. My peppers were very big, and due to the aforementioned rain, were nearly splitting their skins. They were, however, super firm and super hot, so they should mellow out into perfectly wonderful candied jalapenos. The Pioneer Woman recommends saving the leftover brine for use in potato salad or marinating a roast (sparingly, I think, since it was wicked hot), and I did can up one pint and one half pint. I figured I could always use a little spicy hot kick in the depths of winter... I used the 15 minute time recommend to can both the pint and half pint at the same time.

Math savvy readers will note that since I made a double recipe, I still had 2 lbs of sliced peppers to contend with. As the evening wore into late night territory, I used them to make another of my favorite things: escabeche. A favorite Rick Bayless recipe of mine uses fresh ingredients to approximate what I added to my jars - I figured a few pints of these would make quick tacos sometime in the future... mixed with other ingredients or even just beans and rice. I used my Mom's recipe for the brine, which is easily doubled, tripled, quadrupled, etc. The amounts listed gave me exactly 4 pints with no leftover veg, and just a smidge of leftover brine.

Escabeche (Canned)

for the Veg:
  • 2 lbs. fresh jalapenos, sliced about 1/8 inch thick
  • 2 carrots, sliced about 1/8 inch thick
  • 2 onions, sliced about 1/8 inch thick
  • 4 t. Mexican oregano
  • 4 cloves of garlic, each sliced in half
for the Brine: (proportions for 4 pints, this is a triple recipe of my Mom's brine)
  • 3/4 c. olive oil
  • 3/4 c. water
  • 3 c. white vinegar
  • 1 T. (3 t.) canning salt
Pack sterile jars with veg, putting 1 t. of Mexican oregano and 1 clove of garlic in each. Make sure to get a variety of vegetables in each jar.

Bring brine to a full rolling boil. Fill jars to within 1/4 inch of top. Wipe rims, and seal with new lids and rings to finger-tip tightness. Process in boiling hot water bath for 10 minutes, then transfer to a cooling rack to cool completely. (Remember not to start the timer until the water comes back to a rolling boil.) Do not disturb for 24 hours.


I left the other 8 lbs of jalapenos until yesterday to process, and did another 6 pounds into candied jalapenos. Yes, I now have 14 jars of candied jalapenos - on top of the Mexican Pickled Veg and now the Escabeche. Guess I got my spicy fix taken care of!


I probably had *just* a few more peppers than I actually needed, and may have started to cause myself unnecessary stress in how to prepare them. But when the work is complete, and I see them all on the counter, ready for the journey to the basement shelves, it feels so good and satisfying that all of that melts away into oblivion. Granted, I would probably need to eat peppers every single day for the next year to get to the end of my stash alone, but now I have plenty for sharing, and even for perhaps a CakeWalk Giveaway sometime in the near future!

I have a lowly 2 pounds of jalapenos left on my counter, whole ones that are beautifully unblemished from overgrowth. Monica just shared a family giardinera recipe with me, that I'm hoping maybe to make, but I need a few days of rest from those hot beauties. I hope they will still be ready to use early next week. And, hopefully Monica will be up for a canning party so she can keep most of the jars. Otherwise, the Comet will have to contend with RCakeWalk for The Buttafuoco!

Wednesday, August 11, 2010

Of Heat, Dog Days, and Cucumber Gazpacho.


I never think it will happen, yet every single year it does. I always think that it will be different, yet strangely it never is. I usually make a solemn vow that I will appreciate it and soak it up, but come August, that vow goes the way of the New Year's Resolution come February. What am I talking about, you ask? The heat of summer - that brutal, crushing, lung-filling heat that in my area of the world comes with unprecedented humidity.

"First of all, I hate wearing white. Even when I give white a chance, I'm not fooling anyone — I've always been a Rizzo, not a Sandy..." says Diablo Cody, in perhaps the finest piece of summer journalistic op/ed ever crafted. (Really, go read it, I'll wait.) I go further, since I really detest such warm weather favorites such as shorts or *gasp* dresses/skirts, so as the dog days of summer wear on, I find myself wanting to hole up in my a/c inspired house, happily jean-clad, and baking like it's 20 below zero.

Part of my disdain is that despite the humongous bounty of the garden, market, and this year my CSA, I have absolutely no appetite. Even a brisk walk (resulting in the dripping dampness of said non-shorts and non-dresses) can not conjure the slightest hint of hunger, yet due to my self-imposed job of kitchen cohabitation, I feel that I must keep up with my three squares per day. I know other food-people know what I'm talking about. I have to find excuses to make all of the interesting stuff I read about, and like I've said before, I'm the one firmly rooted in the Live To Eat column of human beings.


Enter cold soup. Before the oppressive heat of summer, and for the second installment of my Vegan Mondays, I made a cold Avocado Cucumber Soup. While I've eaten all manners of cold soups in restaurants, I tend not to ever indulge in them at home... and I cannot tell you there is a good reason for it. The Avocado Cucumber Soup was excellent, and now that my state has turned into a sauna, I can even better appreciate it. While that version of soup was vegan, today I made a vegetarian version gifted to me by my friend, Ann.

Though it's been more than a decade since we've worked together, and she moved to California (my envy green and thriving, as you know), we continue to keep in touch. While chatting at Alterra when she was in town recently, she mentioned this soup that has it's origins in the L.A. Times. I had 2 cucumbers firmly residing in my fridge, one in each of my last two CSA boxes. I really love cucumber, but sometimes, I think there is only so much cuke a person can eat - especially since my chosen method of ingestion is sliced and mixed with mayo or sour cream, huge amounts of dill and salt and pepper.

Really my favorite thing about cold soup recipes is that you can go on blending, mixing and tasting until you come up with something you are downright proud of eating. That is exactly how this soup is. And when I finally felt like eating lunch around 2 o'clock this afternoon, nothing could have hit the spot harder than this spicy hot, cold soup garnished with heirloom sweet tomato.


Heirlooms. Just as precious as jewels, in my opinion - and worth the heat of Summer in and of themselves.

I will give you what Ann emailed me, and annotate in {parenthesis} what I actually did. I had to bring the recipe down to about a cucumber and a half's worth of volume.... but you know how to make soup - right? Throw in what makes you happy! (Direction applications are from Ann.) You can easily Veganize this soup by substituting avocado for the yogurt.

Cucumber Gazpacho (via Ann Martens, via the Los Angeles Times)
  • 4 1/2 cucumbers (about 2 1/2 lbs.), divided {I used 1 1/2 cukes}
  • 1 c. plain yogurt {I used a heaping 1/4 c. of my strained Greek style yogurt}
  • 1 t. Thai red curry paste {I used a heaping tablespoon of Spice House red curry powder}
  • 1/3 c. lime juice (Ann's husband, Dave, uses 3 limes and never measures) {I used 1 lime, juiced}
  • 1/2 jalapeno pepper (Dave uses up to three) {I used 2 small ones, from my garden}
  • 1 1/4 t. salt, to taste
  • 1/4 t. pepper, to taste
  • 30 cilantro leaves (Dave uses a big handful, sans stems) {I used a big handful}
  • 20 fresh mint leaves (Dave uses a big handful) {being intrepid still of mint, I used the leaves of 3 good sized stalks}
  • fresh rosemary (this addition is a Dave original!) {I used the needles from one longish stalk of rosemary...}
  • 1/2 c. olive oil {I glugged in about 3 Tablespoons}
  • 1/2 medium tomato for garnish {I used a few of my Black Prince heirlooms, sliced}
"Peel, seed, and cut 4 cucumbers into quarters. Cut the remaining one fourth cucumber in small dice and set aside for garnish.

Place half the quartered cucumbers in a blender jar (I used my food pro, due to the sad state of my blender) and add the yogurt, curry paste, lime juice, jalapeno, salt, & pepper. Puree. While the blender is running, add the remaining cucumber, cilantro, mint, and rosemary (if using). This is a fun stage for kids because it turns green suddenly!

Adjust the seasonings, then while the blender is on, and gradually pour in one-half cup olive oil to emulsify. Chill until ready to serve.

In a small bowl, make the garnish by combining the diced cucumber, 1/2 tsp lime juice, a pinch of salt & pepper, the diced tomato, 1 tsp. olive oil, and a little chopped mint & cilantro.

To serve: Spoon the gazpacho into bowls and sprinkle each with garnish.
We have never made the garnish because we are too impatient. We just pour the soup into big mugs and drink it right away :) Yum!"


I ate about half of my amount for my late lunch today, and plan on eating the leftover glassful tomorrow, as the heat does not promise to give way any time soon. On the brink of each new season, I tend to long for the polar opposite. When Spring was at hand, I longed for fall, a cool reprise, and rainy, damp afternoons. Why do I always want what I can't have, instead of basking in the moment, weather-wise, I mean.

Maybe I'm not so much for the heat, as I am for the cool, a Northerner by birth and genetics (except for that Mexican side...). Layers of clothing and walks without breaking a sweat certainly do sound appealing at this point in the year. Perhaps it's the warm-weathered Mexican part of me that creates these feelings of indecision when it comes to Summer, or maybe it's just that I'm not so hungry. Either way, I am sure I'll be enjoying this cold Cucumber Gazpacho as long as I'm able to get fresh Wisconsin cucumbers. It's certainly one thing that is a perk in these long and hot, dog days of Summer.

Monday, August 9, 2010

Vegan Monday: (Vegan) Graham Crackers


I have to admit that I really don't enjoy making cookies that require me to roll them out. Frosted sugar cookies are some of my favorites, but even during my Christmas baking, I seldom make them just due to this small detail. For someone a bit lacking in counter space, roll-out cookies are kind of tedious. They require me to clear a space and devote my full attention to them, and then there is also the "mess factor" for the type of baker like myself that has a hard time keeping the flour from flying.

Graham crackers are my exception. They really don't make much of a mess since the dough is rather sticky, and they include the added guise of being somewhat healthful. I have a couple of favorite recipes, one from Nancy Silverton, that includes a high percentage of butter (I altered it to include wheat flour) and a new favorite from Kim Boyce which is slightly more virtuous in the fats and flours departments. My favorites so far are utterly dependent on butter and honey, two things that I just assumed were what endeared a homemade graham to me - even enough so that I vowed never to buy them again.

While I stick to my vow, I happily add this vegan version to my glass gasket jar: a winning recipe from Isa Chandra Moskowitz and Terry Hope Romero's book Vegan Cookies Invade Your Cookie Jar. They stand with the incomperable butter laden versions as proud substitutes, substitutes that are worthy in every way should you be vegan or not.


Not only is this vegan version butter free, but it includes only whole wheat flour, a staple in my kitchen. I love the slight bitterness of whole wheat, and prefer it most of the time to almost any other flour, save perhaps oat flour. The plain sugar adds to the crispness, as does the oil. I actually was nearly out of canola, so I used about half the amount of olive oil, a savory note that I found extra addicting! Not to mention that the dough can be rolled out right away instead of resting since it is soft and pliable.

Homemade graham crackers last a freakishly long time. I make sure I bake them until they are very crisp - sometimes I even throw them back in the oven again after they have started to cool and don't appear that they are going to crisp up. The girls do mention that you can leave them a bit on the softer side, if you want to make them into "ice cream" sandwiches. Or, simply spread them with this Chocolate Vegan Frosting... seriously, one of the tastiest frostings I've made, vegan or not (I used Spectrum Organic Shortning in place of Earth Balance).

Vegan Graham Crackers (Isa Chandra Moskowiz & Terry Hope Romero)
  • 1 1/2 c. whole wheat flour
  • 1/3 c. sugar
  • 1/2 t. baking soda
  • 1/2 t. cinnamon
  • scant 1/2 t. salt
  • 1/4 c. oil (I used 2 T. canola and 2 T. olive oil)
  • 2 T. molasses
  • 1 t. pure vanilla extract
  • 1/4 c. non-dairy milk (I used soy milk)
Preheat oven to 350, and line a sheet pan with parchment paper.

In a large bowl, mix together flour, sugar, soda, cinnamon and salt. In a small bowl or measuring cup, whisk the oil, molasses and vanilla. Pour the oil mixture over the flour mixture and mix with a fork until everything is combined well and it appears crumbly.

Drizzle in the non-dairy milk, and mix together gently with your hands until dough sticks together, and it forms a pliable ball of dough.

Line a work surface with parchment paper, and roll out the dough between two sheets of paper. You can leave them a little thicker, or go for the recommended 1/8 inch thickness. Cut off the edges (I used a fluted pastry roller), and cut into squares or rectangles. Save the scraps and re-roll them. Transfer completed shapes to sheet pan.

Bake for 12-14 minutes, longer if they don't seem up to your crispness desires. I baked some of mine for almost 20 minutes! The more crisp they are, the better they store long term - if you think that you wouldn't be eating them all straight away, that is. Cool completely, and store in a lidded glass jar.


I also really like that I have zero waste when making graham crackers. The texture seems to change a little (I think, for the better!), but you can re-roll your "scraps". I usually use tiny cutters on the last little bits of rolled dough. It's almost a challenge to myself to fit the stars with nearly no space in between. Their diminutive shape also ensures supreme crispness, so addicting that they are usually eaten first.


There are many, many recipes in this book that I have to try. Even more in their sister book, Vegan Cupcakes Take Over the World. If they continue to prove their tastiness, I'll have to pick up copies of both books for myself, since these were lent to me by Ginny. The Post Punk Kitchen website also has many great recipes. I actually found the best frosting ever recipe here before I read their books.

This Vegan Monday installment marks the 12 consecutive Monday of posting. Three months of more mindful eating have seriously flown by! I didn't realize at the time, what a great side challenge this was to myself for the summer months. I've found myself consciously making more vegetarian and vegan foods, and since I am obviously more excited than the rest of my family about it, it is a perfect fit due to it's ease of preparation. I've never been an overly meat-dependent eater, but this summer of vastly meat-free lunches and dinners has really reminded me about the ways I actually prefer to eat. With all the food politic storms around us, completely affordable, balanced and delicious meals can be a mainstay, and not one worry of "where that came from" needs to cross my mind.

I've talked with Sasa before about becoming a "restaurant vegetarian", which I am most of the time. We are fortunate to live in the Milwaukee area, where more and more restaurants are sourcing locally, and cooking with the mindset of sustainability. Many area establishments actually know the farms their meats come from, and the animal is not reduced to a mindless rite of the progressive, affluent world. This is good news - and news I should remember when I actually do eat out. I tend to squirrel my resources into eating at home - completely enjoyable, but I forget the pleasures of dining out. I'll have to remedy that a little bit!

Meanwhile, I think Vegan Mondays will stick around for awhile longer. Next week, I will be away from a computer on Monday, so if you check back in a week and notice nothing, don't despair! (Not that I actually think that you would...) This is one obsession that is going to continue for a long while.

Wednesday, August 4, 2010

Canning Mexican Pickled Vegetables (without the wreck of my heart.)

"I was driven to canning by the wreck of my heart." Debby Bull wrote this in her book called Blue Jelly, and these are the opening lines, the ones that I've remembered since I first read it, soon after it was published in 1998.

I remember not really knowing much about canning, or being interested it in at the time I first read that book. I grew up in a preserving household, both my Mom and Gram were avid canners before me. I suppose the deep roots of self-preservation were planted when I was young, but as I stood in the bookstore reading the first chapter of Blue Jelly while trying to escape the wreck of my own young heart, I could feel the first pangs of the desire to preserve something myself.


I was probably half way through the book when I realized that Debby must be from Wisconsin, and she is. She wrote with the West Coast wanderlust that I knew could only come from a Midwesterner. I was able to escape for that afternoon (after I bought it and went back home to read it), but it was such a short tome that it didn't seem to last me nearly long enough. A few more years needed to pass before my brokenheartedness was fully repaired, and this book did nothing to really help it along - but it did emphasize the virtues of canning, and making due with what you have, heartache or no.

In each chapter, she focuses on one canning project. The one that stood out most to me was this one with Mexican Pickled Vegetables. I think she called it Mexican Relish, but since my Mom cans relish and it does not resemble this at all (this is more in the giardinara realm of accompaniments), I took the liberty of renaming. Not too long after I read this book, I canned tomatoes in my small apartment. I did it wearing an apron adorned with blue Ball canning jars that my Mom had got me that said "Yes, I Can" in bold letters across the front. I also called her a few times during the process.

I still remember those lonesome days in that apartment, more than a decade ago, where I felt a lot of the time like I was waiting for my life to begin and where I first canned tomatoes and then jam. My working life got much busier in the future, and I had a several year hiatus from canning of any sort until I blissfully slipped into stay-at-home-motherhood. In the past 2 years, I have canned all sorts of new things, but I actually have never canned tomatoes since then. My Mom cans them for me, and we work out trades. I know I'll be giving her a jar or two of this Mexican Veg, and likely several pounds of Alterra coffee over the next few months...


While I usually always alter recipes, it is important when canning to follow directions exactly. Measure accurately, and don't skimp on the hygienic practices. Be sure your jars are fully sterilized and that you never eat anything that looks or smells strange after it's been on the shelf for a few months. Most importantly, acquaint yourself with canning basics, you can do this through websites such as the National Center for Home Food Preservation (or one of my favorites, Food in Jars), through local classes taught by master preservers, or through your county extension office. A quick Google search will put you quickly on your way to home preserving!

Mexican Pickled Vegetables (Debby Bull, from Blue Jelly)
  • pint jars (my batch made 5 pints)
  • 1 cauliflower, broken into florets
  • 1 red sweet pepper, cut into strips
  • 2 or 3 c. baby carrots, or sliced adult carrots (I used 2 cups)
  • 2 c. celery, cut into 1 inch slices
  • 2 c. small whole onions, or 2 medium onions, quartered (I used the medium onions)
  • pickling salt (do not use table salt)
Pickling Solution:
  • 5 c. distilled white vinegar, 5% acidity
  • 1 c. water
  • 1/2 c. sugar
For Packing in Jars:
  • garlic cloves, peeled (I used 1 per jar)
  • chile peppers, dried or fresh (I used 2 dried chiles de arbol per jar)
Put all the cut up vegetables into a large glass, stainless, or stoneware bowl and cover with cold water and 1/4 c. pickling salt. Stir the salt into a little water before adding it to the big bowl to dissolve it. Cover the bowl with a plate or another bowl that presses down on the veg to keep it submerged. Let it sit for at least one hour.

(Debby Bull tells a story here, in the midst of her recipe, about a country music singer she dated, someone famous - who I wouldn't have been able to Google in 1998 to find out who he was. I was holding my breath it wasn't Dwight Yokam... since she assured me that he turned out to be a louse. I found out that it was Marty Stuart - who'd of thought? I always thought he looked like a nice guy...)

Drain the veg.

Wash the jars in hot, soapy water, then sterilize in boiling water for 10 minutes. (I use my canning pot for this, then keep the water boiling when I fill.) Bring some water to boil over the lids in a small pan, then turn off the heat and leave them to sit in the warm water.

For the pickling solution, combine ingredients in a non-reactive pot and bring to a boil. Simmer for 15 minutes. (I kept the cover on to minimize evaporation.)

To each jar, add some garlic and chiles. Pack hot jars with veg, making sure to get an assortment of everything in there. (Be sure to really pack the vegetables as tightly as you can in there, otherwise after you finish boiling them, they won't be too full.) Fill with boiling hot pickling solution to the top, leaving 1/2 inch headspace. Wipe rims with a clean, lint free towel dipped in hot water (my Mom taught me to use the water that is still hot from boiling the lids).

Place hot lids on the jars, then screw the rings on. Process in boiling water bath (water should cover the jars by at least 1 inch) for 15 minutes. Start timing from when the water comes back to a full rolling boil.

Remove to a draft free place, and let sit for at least 24 hours before moving. When you hear the gentle *ping* of the lids, remember to say "thank you" (like my Mom also taught me). Transfer to a cool, dark place and let sit at least 6 weeks before opening.


I have an addiction to canning once I get going. Then, I run out of jars, or realize that I can't make everything that looks and sounds interesting, since there would be no way for me to eat it all in the next year of it's shelf life, so I try and curb myself a bit. These jars came out of the hot water bath just after 11 last night, and while cleaning up the kitchen I realized that I could just keep going and can up a batch of salsa that I had started preparing. Then I remembered the laundry, and spent a couple hours of quality time washing, drying and folding before turning in just after 1 a.m. Where the time goes in a day, I just don't know. Sometimes I think if I can just elude sleep, I can keep track of more of it, but it is a precious commodity, and it still does slip from my hands just the same.

Canning reminds me of time, I guess. When a jar is pulled from the shelf and is cracked open, I remember the day I made it and what was going on. That is why I've taken to dating the jars with the exact date, rather than just the month and year - which would be totally acceptable. I like to think back to the day it went in, where I got the produce or fruits, and what the state of my household was.

It also brings me back to my Mom and Gram, I remember their pantries and how they looked when they were fully stocked with jars. My Mom was taught and taught me to clean the jars if they got a little sticky from processing before stocking them on the shelf, and to even face and line them up nice and neat: to take pride in the work that you have accomplished. I even think of my Dad, and how he built the shelves for my Mom's hard work... she even made little curtains for them, and they still stand full, though not quite as full as when the family all lived at home.

I like to can for preservation, but just as much, I like to can for nostalgic reasons. Not to forget, that things that come from home canning taste far superior to anything you can buy, organic or not. It is a pleasure to be able to provide for yourself and your family, and it is a pride that comes with the generations for me. Even if I'll be the only one in my house to actually enjoy these hot pickled vegetables! I think with a bit of coaxing, I'll get my Husband to try them, and if they don't turn out too spicy, even the Boy-O, since he does love pickles after all.

Monday, August 2, 2010

Vegan Monday: Soy Yogurt and The Silver Lining

It's not often that I truly dislike something food or beverage related. I like to (proudly) think my palate is sophisticated and varied, but every once in a while I run across something and I think to myself "I really never, EVER, want to try this again". The first time (well, the only time) I had cuttlefish at a pretty nice sushi establishment, I looked across the table at my Husband who had already devoured his slice, and he knew that I was in trouble. This was a cloth napkin type place, not a place in sight for an uncultured Midwestern girl to politely spit a wad of partially chewed fish.

Of course there are foods I prefer not to eat due to processing, but when I run across something I know to be reasonably good for me but I find just in no way palatable, I feel kind of sad. Enter Soy Yogurt: I have never eaten soy yogurt before, but last week mentioned that I would try making it. So I did.


It looks like creamy, tasty yogurt...

I decided to buy and not make the soy milk from scratch. There are plenty of easy instructions out there, and frankly I've just been too busy lately. I enjoy soy milk, but not as much as almond or rice milks, so I pick my battles according to what I love.

I also bought a cultured soy yogurt to use as a starter. The proportions and procedure for making soy yogurt are exactly the same as that for regular dairy yogurt. Milk is heated to 180 degrees, and cooled to 100-110 and inoculated with a culture, 1 tablespoon of culture for a quart of milk. This left the better part of a little soy yogurt for me to taste during the 7 or 8 hour time the soy yogurt was incubating.


Granted, this first sample of soy yogurt was plain, unsweetened and unadulterated by fruit which may have been able to sway me in my harsh opinions. My first bite was awful; It was flabby, waxy and tasted of intensified soy - like an essence of soy. I could not get past the fact that it tasted exactly like a crayon, or at least like the way a crayon smells to me. I thought that maybe it just needed some doctoring, so I added some sweetener. Then granola. I then audibly whispered "this stuff is just vile". And it was! I looked over the ingredient list on the label again, and it did have such things as guar gum and tapioca starch, natural stabilizers that I knew my homemade version would not have so I held out hope that my finished product would knock the socks off it's prepackaged brother.

The soy yogurt took longer to culture than dairy yogurt, about 10 hours. I patiently (actually, I was in no great hurry to try it...) let it sit under refrigeration overnight, to try it for breakfast the next day. It seemed to separate, presumably due to the lack of thickeners, and did taste slightly better than my first experience. The texture was good, and I did manage to eat a small amount of it mixed with fruit into a unattractive smoothie - the soy somehow turned vibrantly colored blueberries into a muddy blue brown color.

While I hate wasting food, this experiment may not get eaten. My Mom has taught me to "let things go back to the earth" and not to feel bad about it if I don't like something, or it gets forgotten about in the fridge. I somehow feel better if I have it laying around for a couple of weeks, it begins to decompose and looks like a shadow of it's original splendor, and then tossing it doesn't make me feel so wasteful. I do have a thorough refrigerator cleaning on the list of things to do today, so maybe I'll be inspired to let it go sooner.

As disappointed as I was with soy yogurt, E told me about a salad that she's been kind of addicted to lately. It is based on marinated beets, and couldn't be simpler. Roasted beets are tossed with equal amounts of olive oil, balsamic vinegar and maple syrup and seasoned with salt and pepper. E has been eating her version with avocados, tomatoes, goat cheese and pine nuts, but I made a nice vegan version in all the colors of the rainbow:


The orange tomatoes were from my CSA, and while the outer appearance wasn't quite blemish free, it was probably the most delicious tomato I have ever eaten! I have reminded myself to never just judge on first appearances...

Full disclosure urges me to let you know that for supper last night (after my vegan photo shoot), I added feta cheese since I had some I needed to use up. I remembered about the avocado, and added some more of the marinade, and really was surprised at how filling and satisfying a rainbow of veg is for dinner!


I'm not sure I would try soy yogurt again. As I'm not staunchly vegan, I guess I don't have reason to. My dairy yogurt is so satisfying and great, and I've taken to straining it and performing more experiments with the whey.


I soaked some yellow mustard seed last night, and made a yellow mustard that even has a couple of tablespoons of whey in it. Apparently, the whey adds to the shelf life, and also most likely makes a common condiment like mustard more of a whole food. I can't wait for the Tongue Splitter Ale to be finished, and I'd substitute the water in the recipe for home brewed beer - then I'd be truly excited! Meanwhile, I need to now find a use for 12 oz. of yellow mustard - any ideas, send them my way...

The ways of experimenting always lead to places I don't expect. I have a new appreciation for my Husband, who just does not like beets. I always think how it is impossible not to love a beet, but after tasting this yogurt, I can not imagine liking it. After all, he goes on eating cuttlefish and last time we ate at Polonez, he ordered (and loved) the tripe soup - for someone I tend to think is picky, these are brave accomplishments. I made this Rainbow Salad for myself, and another green salad and a piece of fish for him, and we were both happy and eating together at the same time, and isn't this what I should be thankful for?

It's easier with a small family to become a short order cook, which is essentially what I have become. Even though not much could make me happier than mimicking the fast pace of a restaurant in my little galley kitchen, I'm trying not to do this so much, since the Boy-O is picky and I need to make him stop being picky. Little by little, it is coming along. For the past week, he devours peas that I planted late in the back yard, ripping open the little "zippers" and popping them in his mouth as fast as he can. Generally, if I can get him to take just one bite of something, he concedes into enjoyment of a new food.

An adventurous-eater-friend of mine (*wink, wink*) told me that while she doesn't always love everything she tries, she would never tell her husband who tends to be a little more reserved in his eating habits. I doubt I could have held back and insisted my family try the yogurt, but I see her point. I often think that if I can just be a good example, that I will seep into the pores of my family - and I daily hope that this is the case. Sometimes I feel daunted in the tasks at hand, but usually persevere, always offering a taste of something new even though I'm most often met with a "no thanks". One day, I know things will change, and then I'll look back on these days of sometime frustration and smile.