Showing posts with label Vegan Monday. Show all posts

Monday, November 15, 2010

Vegan Monday: Sourdough Flatbreads

Vegan Monday this week has to be totally bread related. I know that bread is my gig right now, and that I am living and breathing dough daily for the past two months. I am reading, simultaneously mind you, no less than 5 separate bread related books and I would be lying if I said that I could remember everything that I've been reading. Every baker has a different approach to bread, every sourdough cultivator a different feeding schedule and method. What I really love about experimenting with sourdough is that there are only three ingredients in my bread: starter, water and flour. That's it, and it can feed almost anyone. And it is amazing how tweaking the proportions even in the smallest degree changes the entire finished product.

I am beyond excited now that I have successfully converted, with success, several regular yeast recipes into sourdough starter recipes. If I run into you and start elaborating at length, please forgive me (and/or stop me). In part, I'm excited because the more I can incorporate the culture into my daily life, the less I have to wash away down the sink, and given my recent focus on waste, that makes me very happy. It would also make me very happy to share my starter, so once again, if you are local(ish), let me know and you can have some to experiment with yourself!

I think the key to my successful conversions is counting my sourdough starter as liquid, and adjusting the water in a recipe ratio accordingly. It also probably helps that I am an obsessive type, and regularly bake by weight and not by measure. I usually feed my starter equal weights of water and flour, keeping it roughly the consistency of pancake batter.

Earlier this summer, I had tried the Msemmen (Algerian Flatbread) recipe from the Healthy Bread in Five Minutes a Day book and loved the flavor. I had never seen a flatbread recipe that actually incorporated a spice mixture right into the dough, and being a spice fanatic, I loved it. The day after making the cauliflower pizza, I figured I would try a few of these breads with the leftover dough, and it worked out better than I imagined. The flatbread is called "msemmen", which is a Morrocan or Algerian bread that is almost like a crepe. From what I have read elsewhere, it is less pliable than traditional flatbread, maybe a bit more similar to a cracker.

This could be what I love most about cooking "ethnic" foods: I don't have a frame of reference, so I can infer all of the best things and from reading about food and countries and eat something I find truly delicious, that suits me alone. My apologies to those who have grown up eating this delicious staple, and on whose authorities I would likely change my opinion... But as of this writing, and short of taking a very long trip, it is unlikely that I could gain a frame of authenticity no matter how much I would LOVE to do so.
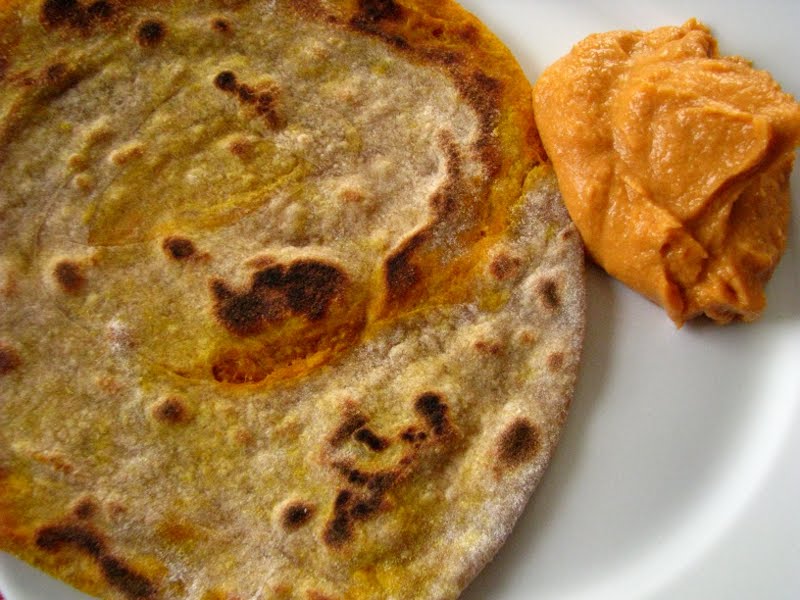


I made tortilla-sized breads, maybe about 6 or 7 inches across, but rolled them up the same way that Jeff and Zoe suggest in their book. I have scaled the recipe back here, but you can find the original recipe and conventional measures in the HBin5 book. If you are interested in adding more sourdough to your life, I hope my scribblings of a recipe will help!

I add only enough olive oil to the spice mix to make a thick paste. This way, it doesn't run out of the dough as much when it is rolled out. It is inevitable that some escapes, but it stains the bread a gorgeous deep turmeric yellow so I count it as a positive.

This is a lolly-gagging, beat-around-the-bush approach to writing a recipe, and I do apologize in advance. If you have a question, please ask! Since I am making far more work out of a quick and easy recipe, it seems par for the course... but really the work is in the natural yeast taking longer to do what it needs to. If you do give the dough time to rest in the refrigerator overnight, you will have more "sour" flavor in the sourdough.


Coiled doughs, resting.

Sourdough Msemmen (adapted from Healthy Bread in Five Minutes a Day)
makes about 10 flatbreads
(Begin the dough the day before you'd like to bake the breads...)
  • 180 grams whole wheat flour (6.25 oz.)
  • 67.5 grams AP flour (2.5 oz.)
  • 1 t. kosher salt
  • 1 T. vital wheat gluten
  • 80 grams sourdough starter (heaping 1/4 c. or 2.8 oz.)
  • 145 grams water, room temperature (5.11 oz.)
(The total amount of liquid for the recipe should equal roughly 225 grams or 8 oz. ) In a small bowl, I first measure in my starter, and add liquid to come up to the correct weight. Stir the starter well with the water to emulsify, then add to the dry ingredients. Correct with additional water if the dough seems too dry, but remember than the dough will slacken some with the long rising time. You don't really have to knead the dough, but I like to turn it over several times in it's bowl to make a cohesive ball of dough. Let rest until double in size, about 8 hours depending on the strength of your starter. At this point you can refrigerate the dough. (I haven't attempted any longer term storage, but left the dough under refrigeration for a day, and had positive results.)

for the spice paste:
  • olive oil
  • 1 t. ground cumin
  • 1 t. paprika
  • 1 t. turmeric
  • 1/2 t. cayenne pepper
  • 1/2 t. salt, to taste
Mix all the spices in a small dish, and add oil enough to make a semi-liquid paste.

When the dough is raised, you can make the breads right away, but since mine was refrigerated, I took out the dough and pinched off golf ball sized pieces. I formed them quickly into balls, taking care not to deflate the dough too much. Just try and be gentle. Then, I let them under a towel for at least a half hour. Roll each ball into a thin round, spread with the spice mix to within an inch of the sides, and then roll up the round tightly like a cigar. Then, coil the cigar tightly onto itself to form a "cinnamon roll looking shape". Let these coils rest on an oiled sheet for about 20 minutes.

When ready to bake, heat a cast iron skillet over medium heat until a drop of water sizzles when tested. (I did not need to grease my pan at all, since I have a very well seasoned one.) Roll the coil out into a thin round and don't worry if some of the spice mix escapes. Use a bit of flour to keep it from sticking as you roll, but try not to add too much. Transfer to the pan and bake until small bubbles form on the surface of the bread. Flip, and continue cooking on the second side until deep brown speckles form, maybe a minute or two. (I covered the pan with the lid of a larger, non-related pan during the cooking of the first side. I don't know why, but I figured it would make it more tender. You wouldn't have to - it boils down to doing it how you like!)

A good rule of thumb for handling this dough is to treat it gently. It is fragile, or at least I pretended it was and it worked for me. Wheat flour has far less gluten in it that regular old white flour, and there is but a whisper of the white stuff in this dough. You can't hurt by erring on the side of caution.


I think, since I was raised on them, I equate all things baked in a cast iron skillet to tortillas. My Mom's version unmatched still by anything I have ever made or likely will make. She does not measure, but the flour tortillas are so light and tender, fully floppy and studded with brown 'beauty spots'. I tend to compare everything round to them, even things like this that are not really that similar, just to see how they stack up.

These are tender in spots and crisp in others, spicy with cayenne (heavy on that, in my case...) and interesting in general. They separate into layers due to how they are coiled and then rolled, and I am amazed that they are still soft at all after the beating they seem to take with the rolling pin. I ate them for lunch with ample amounts of hummus I made using roasted red peppers I had made in advance and frozen (I do about 10 lbs of them late every summer, and then use them throughout the year), and with garbanzos I had pressure cooked a month ago and frozen. With totally unrelated, but no less delicious, chile marinated olives from Outpost, I was in vegan dining bliss.

Had I had some cucumber and tomato, maybe some lettuces, I could have served it to others as a main course. But for me, bread alone is worthy of a meal. Simple, yes, but wholesome and satisfying - and now successful which makes it even better.


These two that were leftovers were cooled several hours and then cut into wedges and polished off when SS came for dinner later that evening. We had pizza for supper, since I did make the Lahey Cauliflower pizza again using the traditional Lahey crust. I have officially crossed it off my list. I may just have to try more Lahey recipes using the sourdough starter. I can't help it. It's in my blood now.


UPDATE:
I tried making a version of these using this leftover sourdough dough that I had in the refrigerator for several days. The dough is from Burp! blog, and it also makes great pizza. I didn't even let it come to room temperature, I just broke off a couple balls of dough, and rolled them out as described above. They puffed up and made a more puffy flatbread, but they were delicious! Creamy inside, with a nice, brittle crunch to the outside - I'll definitely make them again soon. Pictures here.

Monday, November 8, 2010

Vegan Monday: Tofu Scramble (and Bonus: Sweet Potato Smoothie)


I sometimes wonder if my library sees my check-out trends and stocks new books just for me. On our weekly trips to the library, Boy-O usually dictates the time that I can spend looking at books for myself, but usually is able to use his "library voice" long enough for me to at least peruse the New Books shelf. Last week, I was excited to find a brand new vegan cookbook: The Vegan Table by Colleen Patrick-Goudreau.

Colleen's book is a guide to vegan entertaining, and recipes are organized seasonally and by occasion. It's full of great photography and recipes, exactly the type of cookbook that I can read cover to cover and then drop into my endless Amazon cart since I know it will continue to be an inspirational addition to my kitchen library.

So, early this morning when I was "Vegan Mondayless", and awake bright-eyed at 6 AM instead of bleary-eyed at 7 thanks to that daylight savings time, I decided that I had to make a tofu scramble for breakfast. Tofu scrambles, or the vegan approach to scrambled eggs, are things that I've eaten out numerous times, but for some reason have never made at home. The scramble in The Vegan Table looked so good when reading about it late last night, and since I had it on two accounts with recently reading a similar recipe in the VitaMix cookbook, I felt more than confident that a good breakfast would ensue. Well, needless to say, I loved it... and now know that I will probably be making it a lot using up all kinds of different veggies.


Now, I should note that I wish I had a bottomless appetite. The truth is, it usually doesn't take much to fill me up. I used a half recipe (amount from The Vegan Table) which should have fed me, one person, but it actually could have fed me twice. That's OK, since now I have tomorrow's breakfast taken care of...

Vegan Tofu Scramble (adapted from The Vegan Table and the Vita-Mix cookbooks)
serves 1-2, easily doubled
  • 8 oz. firm tofu, crumbled (not silken)
  • 1 T. olive oil or water
  • 1/2 onion, chopped
  • 10 crimini mushrooms, chopped
  • 1/2 - 1 red or green (or some of each) pepper, chopped
  • 1 clove garlic, minced (or pinch of granulated garlic)
  • 2-3 leaves fresh spinach, coarsely chopped
  • 1/4 t. turmeric
  • 1/2 t. cumin
  • 1/4 t. paprika
  • 1 T. nutritional yeast
  • salt and pepper
  • (optionals: chopped jalapenos, diced tomatoes or salsa, red chile flakes... etc.)
Heat olive oil or water in a large pan over medium high heat. Saute onion, mushrooms, garlic and pepper(s) until softened. Stir in crumbled tofu, spices, nutritional yeast and spinach, and saute about 5 minutes until tofu is bright yellow, and heated through. Season with salt and pepper.

I ate half of the above portion with a Black Bean Tortilla that I had made the other day using some leftover pinto beans. The tortillas are also vegan and freeze well.


Tomorrow's breakfast.

Happily working through my morning organizing my house and paring down clutter before Winter comes, I eagerly anticipated this smoothie for lunchtime. Yesterday afternoon, I roasted some sweet potatoes (whole, in their skins at 400 degrees for about an hour) with this recipe in mind. It is in the VitaMix cookbook, and I never would have imagined how delicious it is. So good in fact, that even if you don't have a VitaMix, it would be worth trying to approximate in a food pro or with an immersion blender. But hey, if you live in Milwaukee, just stop in so you can share one with me!

Autumn Sweet Potato Smoothie (VitaMix cookbook)
makes 2 generous cups (I drank one glass, and saved one glass for later...)
  • 1 c. red grapes
  • 1/2 medium orange, peeled
  • 1/2 sweet potato, cooked and cooled
  • 1/2 medium apple, halved
  • 1/4 c. fresh or frozen cranberries
  • 1/2 t. fresh ginger root (I love ginger, so I used a two inch section of ginger root, roughly chopped)
  • 2 whole pitted dates
  • 2 c. ice cubes
  • (I also added about 1/4 c. water)
"Place all ingredients into the VitaMix container in the order listed and secure lid. Select Variable 1. Turn machine on and quickly increase speed to Variable 10, then to High. Blend for 1 minute, or until desired consistency is reached."


Every once in a while, one part of a whole makes me feel like alone it is worth the price of admission. That is how this smoothie is. Like if it was the only thing I ever made in my new machine, it would be fully worth astronomical VitaMix pricing. (Though, in all reality, I couldn't be happier with my machine. It stands up to it's hype, is worth it's price, and impresses me daily - so consider me a proud spokesperson!)

I was thinking about Mark Bittman today, and how he likes to "go vegan until 6 PM". I guess that would be 5 PM central time, and I'm well on my way for today anyway. It is an intriguing idea for those of us omnivores who tend to be heavy on the veg side of things. If it wasn't for my leftovers, that often loom large for me to clobber days after a meal if I forget to appropriately scale down, I would certainly be able to commit to this diet myself!

Monday, November 1, 2010

Vegan Monday: Spaghetti Squash Soup


vegan spaghetti squash soup, originally uploaded by Rcakewalk.

I guess I should have waiting until after lunch to write my Vegan Monday post... since I took my own advice and did use up some forgotten vegetables in the fridge to make this soup for my lunch.

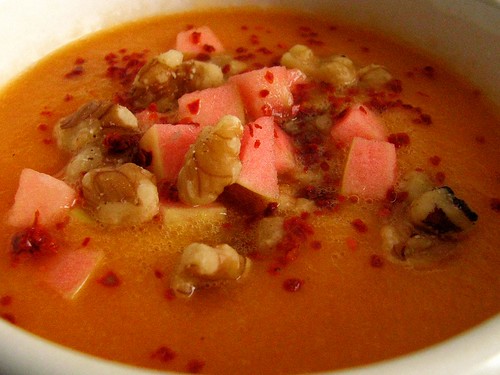
I had about 1 1/2 cups of leftover spaghetti squash, added 1/4 onion, one carrot, cut in half, one cup of water, some sliced garlic and sliced ginger root. I seasoned with red chile flakes, cassia cinnamon and salt and pepper and mixed everything in the VitaMix. (I decided about half-way through mixing to add a teaspoon of cornstarch to help thicken it. I'd have liked it a little thicker, perhaps I'll have some cooked leftover potatoes or sweet potatoes next time!)

One of the fun things about the VitaMix is that it can blend so fast that it makes soup hot. I don't need piping hot soup, so I let it blend for about 4 minutes, maybe a bit longer. Then, I poured my soup into an old tureen from my Gram and garnished with lots of raw walnuts, chopped Hidden Rose Apple, and Aleppo pepper.

Hidden Rose apples are new to me this year, and I love them. They are firm and spicy - not to mention a beautiful and surprising rose color on their interiors. Externally, they are a blushing green, so it is startling to see the pink middles.

If you don't have a VitaMix you can always make soup the normal way, and puree with an immersion or regular blender. A sure way to incorporate leftovers and vegetables into your diet is to remember that you can include them in soup. Never the same twice, I think I'll adopt this approach a lot in the coming months.

Monday, October 25, 2010

Vegan Monday: Spicy Biriyani

Not only do I love spicy food, but I love the word "spicy". In cooking, it so often denotes when something is hot or sharp in flavor, but I get excited when I see true spicy spices like cinnamon working hard and in tandem with more traditional definitions, turning something that would otherwise be a bit bland into something "awake" and exciting.

That is what I thought about when I was making this biriyani last Thursday. I had seen the recipe at Saveur quite a long while ago, and bookmarked it. The original recipe calls for chicken, but seeing as I had a block of tofu that needed using, I decided to marinate and bake it using the same flavors called for in the chicken. I then upped the amount of peppers in the rice, using a combination of jalapeno, red, orange and green peppers. Though you would be hard pressed to see them in the final picture, they are there I assure you.


I pressed the tofu to remove any additional water (I like our local Simple Soyman brand best) for about an hour before marinating and then baking. Since I had the time, I actually let the tofu sit for several hours in the marinade before baking it, but you probably wouldn't have to. I also was happy to discover that I could practically "juice" a jalapeno by grating it on the microplane - and it also allowed for less cleanup.

I baked the tofu and made the rice separately, and then tossed them together to serve. Even my Husband liked this (and had 2 servings!), a huge boost to my ego after he came from a shopping trip in which he purchased jam. (I have an entire shelf dedicated to homemade jams and jellies in my basement...) To store the leftovers, everything was combined. It was even better cold a couple of days later.


I don't really measure things when making baked tofu... I just add as much as I feel like, and make sure not to use too much oil so that the tofu develops that little bit of crispness around the edges as it bakes. That said, the spice mix below is approximate!

Spicy Baked Tofu
  • 1 package (16 oz or so) firm tofu (not silken)
  • 1 T. olive oil
  • 3/4 of a jalapeno, grated
  • 1/2 t. ground coriander
  • 1 T. grated ginger root
  • 1-2 t. cassia cinnamon
  • salt and pepper to taste
Cut the block of tofu in half horizontally (the Simple Soyman blocks are almost square sometimes...) and press between two towel lined plates for at least a half hour to remove any excess moisture. Meanwhile, mix remaining ingredients in a glass baking dish (9x9 works well).

After pressing, cut the two halves in half horizontally again, so you have 4 slabs about 3/4 inch thick. Dredge in marinade, and coat all sides well. Let sit for awhile, or bake right away as you prefer.

When ready to bake, preheat oven to 400 degrees. Bake the tofu for 30-40 minutes, flipping over every 10, until the marinade has absorbed and the tofu looks semi-dry and "baked".

I ate a half of a square while working on the rest of the recipe:


A lot of the same flavors appear again in the rice, and the same thing applies. You can add or subtract as you like. The original recipe also called for soaking the rice. I have read that some types of basmati need soaking, and others don't. I typically don't soak the Tilda brand that I use, but did this time, just to follow instruction. You can or not - if you choose to, just soak for 20 minutes, then drain and rinse and proceed with the recipe.

Vegan Spicy Biriyani (adapted from Saveur)
  • 1 c. basmati rice
  • 2-3 T. coconut oil
  • 2-3 chiles de arbol, crumbled by hand
  • 1 medium onion (I used a white one), chopped medium
  • 2 cloves garlic, thinly sliced
  • ginger root, about 2 inches, grated
  • 2 t. cassia (Saigon) cinnamon
  • 1 jalapeno, sliced and/or chopped finely
  • 1/2 red pepper, finely diced
  • 1/4 orange pepper, finely diced
  • 1/4 green pepper, finely diced
  • a lot of cilantro
  • salt and pepper
(If you would like to put it in the oven to bake, you can time it to go in around the same time as the tofu is coming out: preheat the oven, or reduce the heat, to 350. You could also do the whole dish on the stovetop, the cooking times would be about the same. I used the oven for this instance.)

In a large, lidded saute pan, heat the coconut oil. Add the onion, sliced garlic and spices, and saute until the onions soften, about 6 minutes. Towards the end of the saute time, add the peppers, and let sweat for a minute or two.

Add the rice, along with 1 1/4 cups of water and 1 teaspoon of salt (you can add more later if you like). Bring up to a boil, and (if cooking on the stovetop), reduce heat to low and cook covered for 15 minutes before checking to see if the rice has absorbed most of the liquid and that it is tender. I like to let it sit off the heat for about 10 minutes with a kitchen towel between the lid and the pan to let it continue to steam. If you are baking it, after it boils, pop the lidded pan in the oven, and let it bake for 15-20 minutes, checking on progress of the rice around the 15 minute mark.

Using either method, let it stand several minutes before eating, and toss with the tofu and lots of chopped cilantro. In our case, you will also need to serve with a bit of Mae Ploy Sweet Chile Sauce.


With all the focus on local eating, I should be ashamed that I insist on foreign basmati rice. A few years ago, when I discovered that cooking rice wasn't a science that I needed to attend school to get to know, I visited an ethnic grocer looking for the famed Tilda brand of basmati rice. At that time, I couldn't find it, and went with Swad, a similarly delicious import. As with most specialty foods that at one time seemed scarce in my neck of the proverbial woods, Tilda is now relatively easy to find, and worth every extra cent it costs. All of the flavor of the faraway place can be found in that rice, and when I eat it, I think of the many many people worldwide who have a staple diet of rice. I also think of all the foods in that part of the world that I've never experienced, or that in general, I just know so little about. It has an overwhelming amount to offer me! Maybe that will be my next adventure: the foodstuffs of India and surrounding regions. I like not knowing what comes next from my kitchen... I'll likely wait a bit to embark on a new full-out obsession, since the sourdough is overtaking me and my reading habits lately.

(Lastly, an extra special thank you to Mary-Catherine for telling me that you like my Vegan Mondays. It really inspired me to get my act together and think consciously about making one interesting vegan thing a week to write about. I'm not eating a meat-heavy diet, but it's nice to have that extra little nudge of encouragement! :) )

Monday, October 18, 2010

Vegan Monday: Sourdough Peanut Butter Blondies.


Directly after finishing last Vegan Monday's Chocolate Sourdough cake, my fervor for all things sourdough led me on a quest for more sourdough desserts. Whilst looking at too much information, I found that I really can use sourdough starter in any baked good if I use this proportion: 1 cup of sourdough starter = 1/4 c. flour and 1/2 c. liquid. It seems logical to me, and it made this already great recipe into something even a bit healthier, at least in my own opinion.

I turned once again to Vegan Cookies Invade Your Cookie Jar by Isa Chandra Moskowitz & Terry Hope Romero. (I still have these books on loan from Ginny, and it's embarrassing that I haven't even thought of returning them. You'll likely receive them back with some baked goods, Ginny - hope that makes up for my negligence!!) I am usually a chocolate person. I like chocolate with peanut butter, but not peanut butter with chocolate. Well, this recipe changed all that. It's fudgey and peanutty, thick and dense but not too rich. The perfect non-chocolate brownie.


I omitted the salt from the batter since I only had salted peanuts on hand for the top, and it was a horrible error. The blondies were still great, but missing that once nuance. Nothing a little homemade chocolate syrup (and *gasp*, a little homemade ice cream) didn't cure, but I won't omit it in the future.

Vegan Sourdough Peanut Butter Blondies (adapted from Isa Chandra Moskowitz & Terry Hope Romero)
  • 3/4 c. peanut butter (I used smooth, plain peanut butter from my co-op. Ingredient list: peanuts.)
  • 1 c. sourdough starter
  • half of a 1/3 c. measure of oil (I used coconut oil, and eyeballed it)
  • 1 c. brown sugar
  • 2 t. vanilla extract
  • 1/2 c. whole wheat flour
  • 1/2 t. baking powder
  • 1/2 t. salt
  • 1/3 c. peanuts (for the top - I didn't measure)
Preheat oven to 350. The girls say to use a 8x8 square metal baking dish, but I don't have one, so I used an 8 inch cake tin, and it worked fine. Lightly grease your baking container of choice.

In a large bowl, mix together peanut butter, oil and brown sugar. Mix well, until well incorporated. Add the sourdough starter and vanilla, and blend in thoroughly.

Stir in flour, baking powder, and salt. Mix the dough (using your hands if you need to) well. The batter is very thick, and doesn't spread on it's own. Transfer dough to baking tin, press into sides, and press the peanuts into the top.

Bake for 25-30 minutes, until set and lightly browned on top. Cool completely in tin before slicing.


There isn't much more to say about these beauties. They are what they purport to be, and they are delicious. No one would guess they are vegan, and any die hard peanut fans can rest assured that a peanut craving will be satiated. This pan is long gone, but I feel like I want to make another one.


Oh, it's so easy for me to fall head over heels for sweets during this time of year. From the first whisper of cool weather straight on til January, I feel like I'm entitled to make (and, by default, eat) any and all sweets my heart desires - and fortunately December allows me to give away to my hearts content. By the time January rolls around, I'm easily reconditioned. In time and solidarity with other resolution-makers, I want no sugar whatsoever, and I want to be a virtuous and healthy eater, free of the entrapments of my all mighty sweet tooth.

I have to make a serious pact with myself to eat less sugar, at least until Thanksgiving. Part of the problem, is that I just love to bake, and falling leaves and brisk, humidity free days only serve to add fuel to the fire. But now that I've made actual bread with my starter, I have less excuse to want to use up starter in hollow caloric and fleeting deliciousness, and can concentrate on more healthful endeavors. Wish me luck!

Monday, October 11, 2010

Vegan Monday: Chocolate Sourdough Cake

I think this is my favorite vegan cake to date. It's not so sweet, and has an elegant almost brownie-like denseness. So many times, I think I make the mistake of wanting vegan bakery to taste like their animalistic counterparts: too sweet and too decadent for daily consumption. But while this cake could be doctored into supreme richness, it's mild cocoa and whole grain appeal can easily become a daily cake indulgence that you don't have to feel too bad about.


The base recipe is called "Sourdough Chocolate Devestation Cake", and I found it here. I guess I was beguiled by the name, since I actually found the recipe a bit disorganized, and could find no true author. But, I was convinced that the bones of the recipe were sound, and I did want to continue using my sourdough starter (which does have that habit of growing quickly) in my daily kitchen life. I also decided that instead of making the recommended glaze, which was served on the side anyway, I would make a new batch of chocolate syrup to drizzle under, on and around it.

I used Omahene (natural process) cocoa and raw sugar in my chocolate syrup this time and was impressed with the flavor so much more than normal. Even without corn syrup, I was also impressed that I have no "syrup crystallization issues", and I wonder if it is because I used Dutched cocoa last time? The raw sugar may play a part, too - I have become so enamored of it, I can't see myself ever going back to white granulated.

The original recipe also was enough for 2 9-inch layers, so I based my version on a half recipe. I like to save layer cake for birthdays and company, not for eating daily, mostly on my own... But if one needed a vegan layer cake, this is the recipe, since it makes perfectly beautiful, flat layers and boasts a tight crumb making it easy to cut into perfect slices.


I thought about Alton Brown a lot when mixing up this recipe, since I broke two of his cardinal rules of baking: A) adding the dry ingredients to the wet and B) treating sugar as a dry ingredient instead of a wet ingredient. I was happy with my result, but feel free to mix up a cake whatever way you prefer! I also had originally used 1/2 cup of raw sugar only, but when I tasted the batter, it needed more sweetener. It is a cake, after all and not a plate sized muffin. If you wanted to up the ante even more, add some mini vegan chips to the batter.

Chocolate Sourdough Cake (adapted from Family Oven)
makes 1 9 inch cake layer, easily doubled

Wet Ingredients:
  • 1/2 c. sourdough starter
  • 1/2 c. plus 1/3 c. water
  • 1/2 c. coconut oil, melted
  • 1/2 t. vanilla
  • 1 T. instant espresso powder
  • 1 T. cider vinegar
Dry Ingredients:
  • 1/2 c. whole wheat flour
  • 3/4 c. ap flour
  • 1/4 t. cinnamon
  • 1/4 c. plus 3 T. cocoa
  • 1/2 t. soda
  • 1/2 c. raw sugar
  • 1/4 c. dark brown sugar
Preheat oven to 350.

Combine wet ingredients in a large bowl. In a medium bowl, combine dry ingredients. Add the dry to the wet (the sourdough starter makes the wet ingredients kind of sticky), and mix until just combined, yet thoroughly mixed. (I recently got this whisk from King Arthur Flour, and I can't tell you how much I love it!!)

Pour batter into a 'prepared pan', one that is greased and floured or sprayed with a flour spray. Bake 20-28 minutes until tester comes out clean. Let cool in pan for 10 minutes before removing to wire racks to cool completely.


The cake could be considered a "little on the dry side", but I actually love it as is. Non-Photo-Op slices got a heavy dousing of chocolate syrup, and it sinks in nicely as you eat it, though it tends to slide off the surface and pool seductively around the base of the cake. Last night, I tried a piece first spread with peanut butter and then topped with chocolate syrup. I had to recreate it this morning in natural lighting:


I'll try not to eat it until after lunch. It is also day four of this cake, mind you. I think that sourdough is a great addition to baked goods, so far as my beginning experiments can attest. My new theory is that it acts as an innoculator, like whey, and not only adds that layer of tenderness but also of preservation. I just like the fact that it lives on my counter, and can find it's way into a lot of different things. A perfect friend for me as the colder months are coming up quickly, and I like the excuse to run the oven...

Monday, August 9, 2010

Vegan Monday: (Vegan) Graham Crackers


I have to admit that I really don't enjoy making cookies that require me to roll them out. Frosted sugar cookies are some of my favorites, but even during my Christmas baking, I seldom make them just due to this small detail. For someone a bit lacking in counter space, roll-out cookies are kind of tedious. They require me to clear a space and devote my full attention to them, and then there is also the "mess factor" for the type of baker like myself that has a hard time keeping the flour from flying.

Graham crackers are my exception. They really don't make much of a mess since the dough is rather sticky, and they include the added guise of being somewhat healthful. I have a couple of favorite recipes, one from Nancy Silverton, that includes a high percentage of butter (I altered it to include wheat flour) and a new favorite from Kim Boyce which is slightly more virtuous in the fats and flours departments. My favorites so far are utterly dependent on butter and honey, two things that I just assumed were what endeared a homemade graham to me - even enough so that I vowed never to buy them again.

While I stick to my vow, I happily add this vegan version to my glass gasket jar: a winning recipe from Isa Chandra Moskowitz and Terry Hope Romero's book Vegan Cookies Invade Your Cookie Jar. They stand with the incomperable butter laden versions as proud substitutes, substitutes that are worthy in every way should you be vegan or not.


Not only is this vegan version butter free, but it includes only whole wheat flour, a staple in my kitchen. I love the slight bitterness of whole wheat, and prefer it most of the time to almost any other flour, save perhaps oat flour. The plain sugar adds to the crispness, as does the oil. I actually was nearly out of canola, so I used about half the amount of olive oil, a savory note that I found extra addicting! Not to mention that the dough can be rolled out right away instead of resting since it is soft and pliable.

Homemade graham crackers last a freakishly long time. I make sure I bake them until they are very crisp - sometimes I even throw them back in the oven again after they have started to cool and don't appear that they are going to crisp up. The girls do mention that you can leave them a bit on the softer side, if you want to make them into "ice cream" sandwiches. Or, simply spread them with this Chocolate Vegan Frosting... seriously, one of the tastiest frostings I've made, vegan or not (I used Spectrum Organic Shortning in place of Earth Balance).

Vegan Graham Crackers (Isa Chandra Moskowiz & Terry Hope Romero)
  • 1 1/2 c. whole wheat flour
  • 1/3 c. sugar
  • 1/2 t. baking soda
  • 1/2 t. cinnamon
  • scant 1/2 t. salt
  • 1/4 c. oil (I used 2 T. canola and 2 T. olive oil)
  • 2 T. molasses
  • 1 t. pure vanilla extract
  • 1/4 c. non-dairy milk (I used soy milk)
Preheat oven to 350, and line a sheet pan with parchment paper.

In a large bowl, mix together flour, sugar, soda, cinnamon and salt. In a small bowl or measuring cup, whisk the oil, molasses and vanilla. Pour the oil mixture over the flour mixture and mix with a fork until everything is combined well and it appears crumbly.

Drizzle in the non-dairy milk, and mix together gently with your hands until dough sticks together, and it forms a pliable ball of dough.

Line a work surface with parchment paper, and roll out the dough between two sheets of paper. You can leave them a little thicker, or go for the recommended 1/8 inch thickness. Cut off the edges (I used a fluted pastry roller), and cut into squares or rectangles. Save the scraps and re-roll them. Transfer completed shapes to sheet pan.

Bake for 12-14 minutes, longer if they don't seem up to your crispness desires. I baked some of mine for almost 20 minutes! The more crisp they are, the better they store long term - if you think that you wouldn't be eating them all straight away, that is. Cool completely, and store in a lidded glass jar.


I also really like that I have zero waste when making graham crackers. The texture seems to change a little (I think, for the better!), but you can re-roll your "scraps". I usually use tiny cutters on the last little bits of rolled dough. It's almost a challenge to myself to fit the stars with nearly no space in between. Their diminutive shape also ensures supreme crispness, so addicting that they are usually eaten first.


There are many, many recipes in this book that I have to try. Even more in their sister book, Vegan Cupcakes Take Over the World. If they continue to prove their tastiness, I'll have to pick up copies of both books for myself, since these were lent to me by Ginny. The Post Punk Kitchen website also has many great recipes. I actually found the best frosting ever recipe here before I read their books.

This Vegan Monday installment marks the 12 consecutive Monday of posting. Three months of more mindful eating have seriously flown by! I didn't realize at the time, what a great side challenge this was to myself for the summer months. I've found myself consciously making more vegetarian and vegan foods, and since I am obviously more excited than the rest of my family about it, it is a perfect fit due to it's ease of preparation. I've never been an overly meat-dependent eater, but this summer of vastly meat-free lunches and dinners has really reminded me about the ways I actually prefer to eat. With all the food politic storms around us, completely affordable, balanced and delicious meals can be a mainstay, and not one worry of "where that came from" needs to cross my mind.

I've talked with Sasa before about becoming a "restaurant vegetarian", which I am most of the time. We are fortunate to live in the Milwaukee area, where more and more restaurants are sourcing locally, and cooking with the mindset of sustainability. Many area establishments actually know the farms their meats come from, and the animal is not reduced to a mindless rite of the progressive, affluent world. This is good news - and news I should remember when I actually do eat out. I tend to squirrel my resources into eating at home - completely enjoyable, but I forget the pleasures of dining out. I'll have to remedy that a little bit!

Meanwhile, I think Vegan Mondays will stick around for awhile longer. Next week, I will be away from a computer on Monday, so if you check back in a week and notice nothing, don't despair! (Not that I actually think that you would...) This is one obsession that is going to continue for a long while.

Monday, August 2, 2010

Vegan Monday: Soy Yogurt and The Silver Lining

It's not often that I truly dislike something food or beverage related. I like to (proudly) think my palate is sophisticated and varied, but every once in a while I run across something and I think to myself "I really never, EVER, want to try this again". The first time (well, the only time) I had cuttlefish at a pretty nice sushi establishment, I looked across the table at my Husband who had already devoured his slice, and he knew that I was in trouble. This was a cloth napkin type place, not a place in sight for an uncultured Midwestern girl to politely spit a wad of partially chewed fish.

Of course there are foods I prefer not to eat due to processing, but when I run across something I know to be reasonably good for me but I find just in no way palatable, I feel kind of sad. Enter Soy Yogurt: I have never eaten soy yogurt before, but last week mentioned that I would try making it. So I did.


It looks like creamy, tasty yogurt...

I decided to buy and not make the soy milk from scratch. There are plenty of easy instructions out there, and frankly I've just been too busy lately. I enjoy soy milk, but not as much as almond or rice milks, so I pick my battles according to what I love.

I also bought a cultured soy yogurt to use as a starter. The proportions and procedure for making soy yogurt are exactly the same as that for regular dairy yogurt. Milk is heated to 180 degrees, and cooled to 100-110 and inoculated with a culture, 1 tablespoon of culture for a quart of milk. This left the better part of a little soy yogurt for me to taste during the 7 or 8 hour time the soy yogurt was incubating.


Granted, this first sample of soy yogurt was plain, unsweetened and unadulterated by fruit which may have been able to sway me in my harsh opinions. My first bite was awful; It was flabby, waxy and tasted of intensified soy - like an essence of soy. I could not get past the fact that it tasted exactly like a crayon, or at least like the way a crayon smells to me. I thought that maybe it just needed some doctoring, so I added some sweetener. Then granola. I then audibly whispered "this stuff is just vile". And it was! I looked over the ingredient list on the label again, and it did have such things as guar gum and tapioca starch, natural stabilizers that I knew my homemade version would not have so I held out hope that my finished product would knock the socks off it's prepackaged brother.

The soy yogurt took longer to culture than dairy yogurt, about 10 hours. I patiently (actually, I was in no great hurry to try it...) let it sit under refrigeration overnight, to try it for breakfast the next day. It seemed to separate, presumably due to the lack of thickeners, and did taste slightly better than my first experience. The texture was good, and I did manage to eat a small amount of it mixed with fruit into a unattractive smoothie - the soy somehow turned vibrantly colored blueberries into a muddy blue brown color.

While I hate wasting food, this experiment may not get eaten. My Mom has taught me to "let things go back to the earth" and not to feel bad about it if I don't like something, or it gets forgotten about in the fridge. I somehow feel better if I have it laying around for a couple of weeks, it begins to decompose and looks like a shadow of it's original splendor, and then tossing it doesn't make me feel so wasteful. I do have a thorough refrigerator cleaning on the list of things to do today, so maybe I'll be inspired to let it go sooner.

As disappointed as I was with soy yogurt, E told me about a salad that she's been kind of addicted to lately. It is based on marinated beets, and couldn't be simpler. Roasted beets are tossed with equal amounts of olive oil, balsamic vinegar and maple syrup and seasoned with salt and pepper. E has been eating her version with avocados, tomatoes, goat cheese and pine nuts, but I made a nice vegan version in all the colors of the rainbow:


The orange tomatoes were from my CSA, and while the outer appearance wasn't quite blemish free, it was probably the most delicious tomato I have ever eaten! I have reminded myself to never just judge on first appearances...

Full disclosure urges me to let you know that for supper last night (after my vegan photo shoot), I added feta cheese since I had some I needed to use up. I remembered about the avocado, and added some more of the marinade, and really was surprised at how filling and satisfying a rainbow of veg is for dinner!


I'm not sure I would try soy yogurt again. As I'm not staunchly vegan, I guess I don't have reason to. My dairy yogurt is so satisfying and great, and I've taken to straining it and performing more experiments with the whey.


I soaked some yellow mustard seed last night, and made a yellow mustard that even has a couple of tablespoons of whey in it. Apparently, the whey adds to the shelf life, and also most likely makes a common condiment like mustard more of a whole food. I can't wait for the Tongue Splitter Ale to be finished, and I'd substitute the water in the recipe for home brewed beer - then I'd be truly excited! Meanwhile, I need to now find a use for 12 oz. of yellow mustard - any ideas, send them my way...

The ways of experimenting always lead to places I don't expect. I have a new appreciation for my Husband, who just does not like beets. I always think how it is impossible not to love a beet, but after tasting this yogurt, I can not imagine liking it. After all, he goes on eating cuttlefish and last time we ate at Polonez, he ordered (and loved) the tripe soup - for someone I tend to think is picky, these are brave accomplishments. I made this Rainbow Salad for myself, and another green salad and a piece of fish for him, and we were both happy and eating together at the same time, and isn't this what I should be thankful for?

It's easier with a small family to become a short order cook, which is essentially what I have become. Even though not much could make me happier than mimicking the fast pace of a restaurant in my little galley kitchen, I'm trying not to do this so much, since the Boy-O is picky and I need to make him stop being picky. Little by little, it is coming along. For the past week, he devours peas that I planted late in the back yard, ripping open the little "zippers" and popping them in his mouth as fast as he can. Generally, if I can get him to take just one bite of something, he concedes into enjoyment of a new food.

An adventurous-eater-friend of mine (*wink, wink*) told me that while she doesn't always love everything she tries, she would never tell her husband who tends to be a little more reserved in his eating habits. I doubt I could have held back and insisted my family try the yogurt, but I see her point. I often think that if I can just be a good example, that I will seep into the pores of my family - and I daily hope that this is the case. Sometimes I feel daunted in the tasks at hand, but usually persevere, always offering a taste of something new even though I'm most often met with a "no thanks". One day, I know things will change, and then I'll look back on these days of sometime frustration and smile.

Monday, July 26, 2010

Vegan Monday: Spicy Fried Tofu


Lately I have been craving fried tofu that is creamy in the center and crispy on the outsides. I suppose it is in part because a few weeks ago, I had a sandwich containing this magical mix of textures, and the added bonus of giardinera (another thing on my canning list this summer), at Comet. On my last visit to my Parents house, I had a Spicy Chinese Tofu dish at our favorite Chinese spot in Tomah, Peking Chinese. It was exactly what I wanted there as well: creamy tofu cubes with crunch, and served in a spicy Chinese brown sauce.

I never really dreamed that I could make a comparable tofu at home, but when I saw this post last week for Japanese Style Salt and Pepper Tofu from Almost Bourdain, I knew right away that I had to try it. Since I wasn't overly hungry last night, I figured I'd try it out - just to see if it would be everything that I hoped it would be. It was!

Ordinarily, I hate frying in my house. Not only are there health concerns, but more importantly, I have no hood ventilation - so any frying immediately results in a cloudy, smoky home. But for this tofu, I'd happily endure that small annoyance. Though I ate these bites rather snack-like, it would be easy to make a meal out of them by adding a rice and vegetable bowl or even floating them across an Asian style soup at the last moment. Any way you try them, they are addicting (and easy) enough that you will certainly find yourself wanting to include them in your cooking in all different ways.


With Sweet Million and Sun Gold cherry tomatoes from the back yard... This could be a very sophisticated appetizer!

Ellie uses potato starch, which I did not have. I did have tapioca flour, and it worked wonderfully. She also deep fries, whereas I decided to pan fry, so if you opt for deep frying, make sure your oil is at least 3 inches deep at 350 degrees. I scaled the seasoning down to accommodate a smaller amount of tofu - the amount listed will easily season a whole package of firm tofu (I used local brand Simple Soyman), though I wouldn't recommend using a "silken firm" style of tofu since the textures would not be the same.

Spicy Fried Tofu (adapted from Almost Bourdain)
  • 1 package firm tofu (about 500 g.)
  • 2 T. kosher salt
  • 3/4 t. white pepper
  • 1/4 t. Chinese 5 spice powder
  • tapioca flour, for dredging
  • green onions, cherry tomatoes, and aleppo pepper for garnishing
  • grape seed oil for frying
Heat oil over medium high heat in a skillet, using enough oil to coat the bottom of the pan. Mix salt, pepper and 5 spice powder in a small bowl. Cut the tofu into cubes, about 1 inch by 2 inches, and dredge in the tapioca flour until all the surfaces are covered. Let sit for at least 30 seconds. Sprinkle with seasoning mixture, and fry in hot oil until golden, turning as each side browns. This will take 10-20 seconds per side depending on the heat of your oil. I turned them using a pair of chopsticks. Remove to drain on kitchen towel or paper towel. Garnish with onions and/or tomatoes and at them when they are still hot, and you will be rewarded with a crisp exterior and a smoothly creamy interior.

I used quite a bit of the salt mixture, and had a salty crunch to the outsides. The insides remained creamy and I was so excited that I had made something that was exactly what I was hoping for. You could also experiment with a whole host of spices for the outside, almost eliminating the salt if you desired.

While I was fully aware that I was planning to post this for the Vegan Monday series, I could not help serving up one of the pieces with some of my homemade yogurt. Laura was just telling me how she strains her yogurt through a handkerchief to separate the whey from the solids, leaving behind the thickest Greek-style yogurt you have ever tasted. Previously, I had used a coffee filter, which also works, but I was able to fashion a "bag" out of the handkerchief and hang it up to drain. I also collected the whey to use in other projects. Yogurt would be a good accompaniment to this spicy fried tofu, and I'm going to work on a vegan yogurt version straight away.

I did take a look at some labels on soy yogurt during my last shopping trip. I just have to give this a try and report back next week. Yogurt cultures are adaptable to soy milk, but I think that I need to purchase a soy yogurt to use as a live starter. If I had this foresight prior to making this delicious fried tofu, I would not have to take back this vegan post and re-label it, well at least a couple bites of it, a vegetarian post.

Either way, this is so good I know that I'll be playing around with it for a while!


Monday, July 19, 2010

Raw Vegan Monday: Macadamia Caprese


I had to make another raw vegan recipe from The Conscious Cook this week: Macadamia Caprese. While the author of The Conscious Cook, Tal Ronnen, is not strictly raw, he invited a guest raw vegan, chef Chad Sarno, to contribute this recipe. It is visually stunning; at a glance you would never know that it was vegan, and it really is easy to prepare..

The "cheese" is made by culturing macadamia nuts with probiotic culture, much the same way as the cashew cheese I made earlier this summer. I can't say that the flavor was all that different using the macadamia nuts than it was with cashews (and cashews are far less expensive), but the cheese was much more firm due to the way I cultured it.


I weighted it down with my sophisticate pie weights (white beans in a canning jar) and left it in my oven overnight with the light on. That trick keeps your oven mildly warm without using too much electricity, and when my a/c (even with the house set at like 75 f...) has barely stopped running for the past week, I needed to be sure it was warmish and draft free. You may also recall I use this trick for culturing buttermilk and sour cream, and it always yields great results.

The cheese firmed up nicely, and had the same base flavor as the cashew cheese that was cultured the same way, but lacked a little of cashew's sweetness. Vegan cheese is strange, because you kind of want to believe that it will taste like cheve or whatever varietal it appears it should approximate, and it just does not. It is it's own thing. I believe that I can appreciate it for what it is, while also noting that it is nothing like actual dairy cheese. This one was rolled in crushed black pepper, tarragon and chives from my garden, and I did think that it was beautiful to look at, probably why my Husband even tried a slice with a spicy tomato, and thought it was all right, I noted however that he did not ask for seconds...


It's funny, too, that I'm posting this cheese directly after a grilled cheese post!

I would have to say that the star of this appetizer had to be the tomato. They are semi-dried, and spicy with Cajun seasoning. Since raw vegan cooking prohibits the use of boiling water, very hot water is used to cover the tomatoes (bottoms pierced in an "x") for 10 minutes, stems in tact. Then, remove them to an ice water bath for 5 minutes or so, and carefully peel them. I didn't think that it was going to work, but it did! Sprinkled with Cajun spice (I used Penzey's Hot Cajun) and a bit of sea salt, they rest on a screen at room temp for several hours - I left them for about 8. They form a little bit of a dried crust on the outside, and retain all of their lovely tomato-ness inside.


I really do love The Conscious Cook cookbook. It's well designed and executed, and offers many interesting things for the adventurous vegan cook. Since I was unable to find the macadamia cheese anywhere else online, and Chad Sarno was gracious in publishing his recipe through another chef's book, I will suggest that you find a copy! I first saw and became acquainted with the book at my library, and it is now in my ever-bottomless Amazon cart for future purchasing. Meanwhile, if you'd like to try another of his similarly styled vegan cheeses, you can have a look here at the rawchef website.


It is so true that the stipulations of being raw and vegan do so much to spark kitchen creativity. It's not just raw carrot sticks and a handful of nuts to these pioneering chefs. While personally I enjoy a wide range of foods, I continue to gain a deeper appreciation for those with strict diets - for either social or food allergy reasons.

I am frequently reminded of a fortune cookie I once opened: "One hundred people, One hundred minds". It's easy to read that and dismiss it, but it is so true. Every one of us feels and thinks passionately about something, and it may or may not be the same opinion as our closest friend, a parent, or even a spouse. I'm not saying that there aren't things that are inherently right or wrong, but that surface opinion varies from person to person - and doesn't that make for the spice of life!

I like to think "food people" tend to be kindred spirits, exploratory folk who will try anything at least once, but that is not always the case. 100 minds... If you have never thought about eating or preparing something vegan, I'd urge you to give it a go. You may just find that you can't stop! See you next week on Vegan Monday!


Monday, July 12, 2010

Vegan Monday: Pasta!

Well, a whole week has passed without a single word from rcakewalk. The truth is, I had a lovely Summer Cold most of last week, and really didn't do much cooking until I needed to get ready for the Boy-O's birthday on Friday. I feel like I have a lot of time to make up for, since being compromised in taste and smell faculties rendered me a pretty poor kitchen experimenter for many days. (Though, I did manage to read all the way through Wild Fermentation - and start a "ginger bug", and then after the bug was going, I bottled a little batch of ginger beer.)

Last night, I knew that I was feeling better, when I was automatically planning what I could come up with for my continuing Vegan Monday postings. Since my basil was in need of pinching back again, I figured pasta and pesto would be a good choice for supper... and it was a happily sneaky one that my Husband ate without knowledge of its delicious vegan-ness.


I really love making pasta from scratch. I've done it now for probably 12 years, and can't say that I've ever tried to make it without eggs. What's even worse, is that I wrote a post about beet pasta, in which I tweaked a recipe I saw in the Outpost Exchange that did not contain eggs, and I actually said that I prefer pasta that does. I can now attest that this is because I never had homemade semolina pasta. It is wonderful, and easy to do, and I may just have to take back the song previously sung about the wonders of egg pasta.


Semolina flour, in it's sand-like peskyness, is very high in gluten - which enables it to stretch and not break when cooking. I noticed the difference immediately when working with the dough. It was a resisting, silky thing; when rolled thinly (notch 6 on my Atlas Pasta Queen), it felt as if I were feeding a sheet of peached cotton through the cutters. The strands of finished fettuccine did not stick together either, and I could see myself actually able to roll little nests like Marcella Hazan without much difficulty. The dried pasta (seen in the first photo, above), did not break or crack when I moved it to a sheet pan. I was excited, since already I could tell that I was going to be so happy with the cooked result.


This morning, I mixed up a small batch using proportions from A Life(time) of Cooking. I needed almost twice the amount of water she recommended, but went by the feel of my egg pasta past, and was indeed rewarded with the pretty little dough seen above. Then, Boy-O (now a proud 4 year old!) and I went for a walk. As I like to err on the side of gluttony (a phrase coined by my Husband and Maeckel), I decided I had to make a second little batch, only whilst walking, I figured there was no reason not to try it with wheat flour and semolina.

Since the recipe calls for equal proportion of all purpose flour and semolina flour, I'm imagining all kinds of whole grain flour combinations are going to be tried sometime in the future. I used a white whole wheat flour from King Arthur Flour. The dough was just as nice to work with, and cooked up into a mildly, wheat flavored pasta. I heard no complaints from either of my guys, so I'm taking it that they couldn't even tell. I think the truth of the matter is that homemade pasta so far surpasses store bought pasta, that you would be hard pressed to find someone who thought otherwise.


The base recipe suggests that for each generous serving, these are the proportions to use. When I had two batches (using different flours), the total weight was just shy of 1 lb... The best thing about homemade pasta, is that it does store well. Just make sure it's dried well first, and then seal it in a zip top bag. It's even more of a convenience food than it's supermarketed brethren, since it takes mere minutes to cook. Even more reason for you to give it a go!

(Vegan) Semolina Pasta (adapted from A Life(time) of Cooking)
  • 1/2 c. semolina flour
  • 1/2 c. AP flour (or white whole wheat - I used KAF)
  • pinch of salt
  • 1 t. olive oil (eyeball it)
  • 6-8 T. water, to feel
In a medium sized bowl, mix the flours and salt. Add the olive oil, then 4 T. of the water, while stirring the forming dough with your fingers. Add enough water to get the dough to form into a ball. (The semolina flour, and the wheat flour, will soak up a bit more liquid than regular AP flour.) When the dough is formed into a ball, knead gently for a few strokes on a wooden board to be sure everything is incorporated well.

Let the dough rest for at least a half hour. Roll out either by hand on a well floured board, or by hand cranked or stand mixer attachment, using regular AP flour as necessary. Cut into desired shape, and let dry (or cook right away).

When cooking, bring an ample amount of salted water to boil and add the pasta. Watch it carefully, it takes just a few minutes to cook. I start testing it when I see it boil up to the surface, usually around the three minute mark.


Semolina/AP flour pasta on the left, semolina/white whole wheat pasta on the right.

Of course, since I went through the trouble of making eggless pasta, I made a vegan pesto as well - from another winning recipe from Dreena Burton's Eat Drink & Be Vegan. I found the recipe printed for you here, from an interview that Dreena did for Vegan Freak Radio, and let me tell you - you may never find yourself buying a pine nut ever again. It was so creamy, fresh, and when I first tasted it, the bite of raw garlic perfectly complemented the other ingredients. (The only thing I did differently, other than not really measuring anything, was to omit the dried mustard. Why oh why do I always remember that I don't have this spice stocked until the last second? The amount needed was too little to be processed out of mustard seeds in my coffee mill/spice mill... so I just left it out.) I'm looking forward to having some of the leftovers on a pizza tomorrow...


While the final dish left something photographically to be desired, the taste did not. The pasta had perfect bite, just a tad more toothsomeness in the whole wheat version, and because I remembered to save some of the pasta's cooking water, I had a nicely thickened pesto sauce that gently coated the noodles. You could go all out and load up on the sauce, like Dreena does, but I have hopes for my leftovers tomorrow, so I restrained.


I'm sure I'll be back to my cooking self this week, and already I'm behind on my weekly fermenting/culturing duties. I actually have to start my next kombucha batch now before I hit the hay...

But before I do go: A non-vegan bit of information I must pass on! I got the best tip ever from my reading of Wild Fermentation for all of you yogurt makers out there: for every quart of milk you are inoculating with the yogurt culture from a previous batch, only use 1 Tablespoon of culture. 1 Tablespoon! I always use much more, but thanks to Sandor (and The Joy of Cooking) - who explained that less culture gives the bacillus room to move and creates a thicker, creamier result. I did this today, and in just 7 hours had beautifully thickened yogurt, with no separation!

So how is THAT to end a Vegan Monday post! From what I've read, you can make a soy or alternative milk yogurt from a culture, but the culture will not perpetuate. Also, I do not believe that the cultures can be dairy free to start... so now I'm curious, and have some label reading to do on my next Outpost trip. Maybe I know what direction I'm heading for next week's vegan post...