
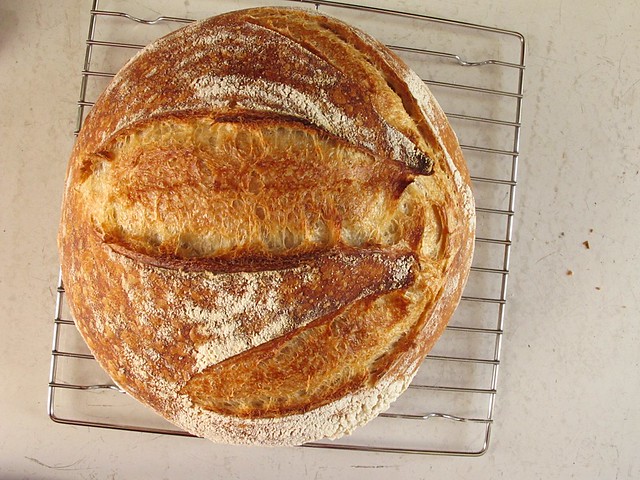
I tore into this loaf this morning, the heat of the oven still lingering in the heart of it, unable to stand the anticipation. I am ordinarily staunchly observant of waiting until a loaf of bread is completely cool, two hours at minimum before even considering the first slice. The bread is still developing, it is curing, standing in the room temperature and maturing into what it will become. It is beautiful to glance at and wonder the flavor of. It is the best test of my self-control.
This particular loaf is the elusive Tartine bread - the one that I have tried to make since sL turned me on to Chad Robertson and his gorgeously photographed book. As the reviews of Tartine Bread told me, some people were dismayed that it took him 22 pages to explain a loaf of bread, but maybe even experienced bread makers like me need that much information. When working through this loaf yesterday to the letter, I realized that the reason high-hydration doughs weren't working out so well for me, the reason that the Tartine bread wasn't working out for me, was that I didn't do a couple of important things. And I was impatient.
This particular loaf is the elusive Tartine bread - the one that I have tried to make since sL turned me on to Chad Robertson and his gorgeously photographed book. As the reviews of Tartine Bread told me, some people were dismayed that it took him 22 pages to explain a loaf of bread, but maybe even experienced bread makers like me need that much information. When working through this loaf yesterday to the letter, I realized that the reason high-hydration doughs weren't working out so well for me, the reason that the Tartine bread wasn't working out for me, was that I didn't do a couple of important things. And I was impatient.
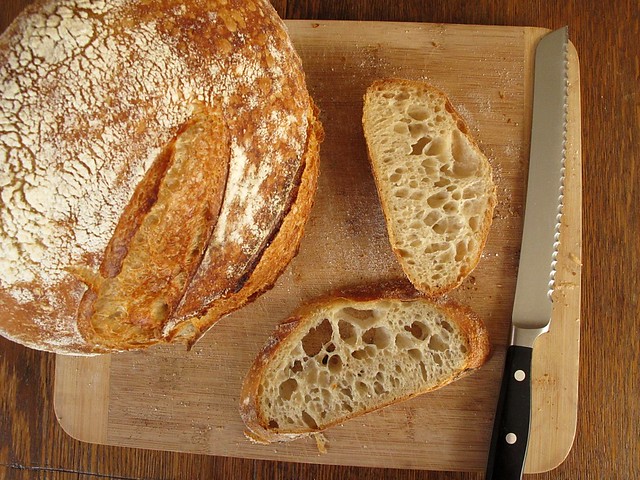
I had omitted the bench rest - and when I had done a bench rest in the past, I didn't form the dough well enough before letting it rest. I think I was even baking it at a higher temperature, the same temperature I bake my traditionally kneaded loaves, instead of starting it out higher and lowering the oven by 50 degrees the second I put the bread in. I couldn't figure out before why all of the airy holes in my Tartine bread were centralized directly under the top crust - and while the bread tasted ok, this plagued me. I wanted beautifully, consistently artistic bread, I wanted lacy, open holes with a wet-custardy interior. I wanted to go to California and beg Chad to let me work a day or two in the bakery. I just needed to develop the loaf into a better shape, taking more time to let it rest.
A nagging problem of mine is that I cannot bake bread every day. I imagine how much faster I would learn things if I could bake daily instead of once or twice a week. My last loaf (on the right in the photo below) was so disappointing, that I was convinced to mix up a new loaf of bread yesterday - and instead of continuing on the string of hit-or-miss breads I was doing I opted for the Tartine ratio once again.
A nagging problem of mine is that I cannot bake bread every day. I imagine how much faster I would learn things if I could bake daily instead of once or twice a week. My last loaf (on the right in the photo below) was so disappointing, that I was convinced to mix up a new loaf of bread yesterday - and instead of continuing on the string of hit-or-miss breads I was doing I opted for the Tartine ratio once again.
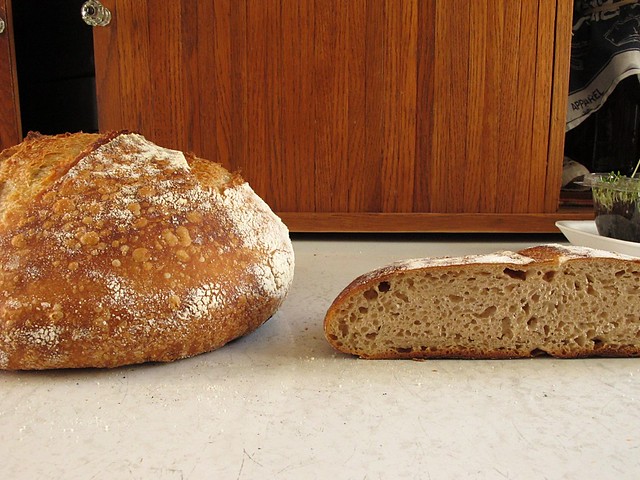
yeah, that one didn't really rise at all.
It's not a stretch for me to realize that one of the benefits of writing things regularly into a food blog is that I record in indelible Internet ink those things that are important enough to my kitchen life to remember. Things that may help others too, but mostly things that I don't personally want to forget. In this case, I want to write the Tartine method in a condensed way that I will remember. I want to remember that I can not rush the bread.
The bread reminds me that I need to be patient. I need to wait for it, even if I don't want to. I need to remember that even bread that "flops" still has a place and a use in my kitchen. I baked some of the non-stellar loaf this week into a modified strata-esqe quiche, and appreciated it as toast.
but this bread is a joy to eat, plain and unadorned, contemplatively.
I do not rely on the temperature of water, and I am at the mercy of room temperature - whatever that variable may be. My goal as bread maker is to be able to adapt to my environment, to roll with Mother Nature in all of her endless glory and take it into consideration. I have a 5 gallon jug of spring water that I use for baking, at my ambient, varying room temperature and that is the temperature I use for mixing dough. I also let the bulk fermentation occur at room temperature, in the case of Tartine method, I fold it every 30 minutes for the first 2-3 hours, then once an hour until the dough looks like it has accomplished about a 30% increase in bulk overall. The below "Tartine Condensation" is what I will follow on my next loaf.
The ratio is for a 75% hydration sourdough bread. I make a single loaf at a time, so double everything for two loaves. Post baking, this loaf weighed in just shy of two pounds. I feed my starter early in the morning, and then wait until a spoonful floats in a glass of water, 2-3 hours or maybe 4. This is really crucial to good rise it seems. (It's a good thing my kid decides to get up at 5:30 every morning now, that really helps me out.) I use 1 1/2-2 t. of salt for a single loaf of this bread. The original method calls for 10 g. of salt per loaf, and I'm not sure if my scale isn't that great with small amounts or what... but that is way too salty for my taste.
I also like to retard the bread in the fridge overnight. I let the dough rise for a couple of hours until I can tell it is rising, then I put it in the fridge. I take it out when I turn the oven on to heat, and bake it after it has been at room temp for only about a half hour. I never thought baking still pretty cold dough would work that well, but it does. Lesson learned.
Tartine Bread Method Condensation
Mixing Dough:
- Weigh 350 g. of water into a large bowl. Add 100 g. of starter and stir to disperse.
- Add 50 g. wheat flour (I use high-protein wheat) and 450 g. white bread flour. (500 g. total) Mix by hand until well-incorporated.
Autolyse
- Rest the dough (autolyse) for 20-40 (I go for 30) minutes.
- After autolyse, add salt (1 1/2 t. if using fine, RealSalt or 2 t. if using Kosher) and 25 g. water. Squeeze the dough to incorporate the salt and water - the dough may break apart, but will come back together. It will be sticky. I leave the dough in the same bowl for bulk fermentation. I just make sure I've scraped the edges down and it is reasonably free of bits that could become dry and hard.
Bulk Fermentation:
- Let bulk fermentation commence. The whole bulk ferment will take at least 4 hours, (I note the time and set a timer on my phone). Every 30 minutes, fold the dough by bringing the bottom of the dough up over the top, as described in the book, by using your hand first dipped in water to prevent sticking. I do this for the first 3 hours, then once an hour until the dough looks like it has completed the bulk rise (about a 30% increase in the total bulk of the dough). For the final hour(s) of bulk fermentation, fold extra gentle to avoid knocking out air.
Initial Shaping and Bench Rest:
- On an unfloured surface, turn out the bulk of dough using a spatula. Lightly flour the surface of the dough, and using a bench scraper as an aid, flip the dough over so that the floured bit is on the bottom. Fold up the bottom third of dough past the center, stretch the right and left sides in over the center mark respectively, then fold down the top past the center mark, and roll the dough toward you as gently as you can. You want a basically round shaped bread. Try not to use much flour, and use the bench scraper to aid you.
- Let rest for 30 minutes uncovered, out of any drafts. Dough should spread some into thick "pancake" shape, but not be "drippy" as Chad says. If it is drippy or if it doesn't look like you formed the dough well, reform carefully and let sit again.
- Lightly flour the top of the dough. Slip bench knife under it and flip it so that the floured bit is again at the bottom. Form again as before for initial shaping, bottom third up, right and left sides in respectively past the center mark, top down and roll the dough towards you - being sure to be firm yet gentle.
- Line a basket with cloth, sprinkle it well with 50/50 flour and rice flour mixture, and put the loaf in smooth side down. Let it rise for 1 1/2 - 2 hours until it looks like it's on the way to rising well, then put in the fridge overnight. When the dough is rising, I cover it with the ends of the towel, and slide the whole basket into a plastic shopping bag a la Peter Reinhart. I put it in the fridge in the same set up.
Baking:
- Take bread out of the fridge, remove it from the plastic bag if you used it, and preheat oven to 500 with a covered cast iron pot inside. Wait 30 minutes until the oven comes up to temp. Remove pot, carefully turn out bread into the pot. Score artistically or utilitarian-ally, put the lid on and put in the oven. Immediately reduce heat to 450 and bake 20 minutes.
- After 20 minutes, remove lid. Bake an additional 25-35 minutes until the level of darkness on your bread is achieved. Cool on a wire rack as long as you can stand it. Then, eat.
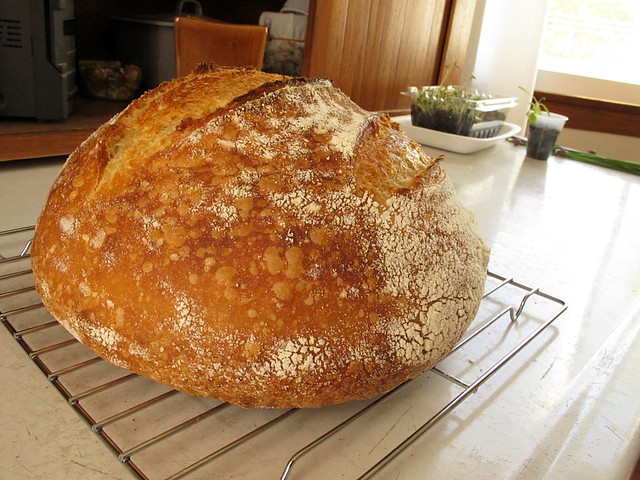
blisters.
As my stand mixer has died, and I'm not so certain it will be resurrected (and I'm not so sure I will invest in that machine again, and I am not sure what to do...), I am planning on lots of practice with this type of low-knead or no-knead sourdoughs. While my hands are healing, I still need to be careful, lest they attack me again. I've even taken to wearing garden gloves this year, something I have never done before - and that is also a big help. (In fact, when folding the dough during the bulk fermentation, I use a disposable kitchen glove on one hand that I use for the length of the rise. I dip it in water, just like I would with ungloved hands and it works fine and saves me a handwashing every 30 minutes.)
I will now remember to slow down. Bread is a true slow food, perhaps the first slow food, and all attempts by me to speed up the process never end well. They may end edibly, but not really worth writing about. When the bread feels like a duty to eat, I am not happy. When it emerges fat-bellied and golden, slightly sour, miraculously perfect... then it is my deepest pleasure to sit with the heel of it in my palm - turning it over and examining the crust then chewing it unadorned by jam or butter to taste the real taste of bread. Slow bread that needs all the time I can give it. Well-noted.
I will now remember to slow down. Bread is a true slow food, perhaps the first slow food, and all attempts by me to speed up the process never end well. They may end edibly, but not really worth writing about. When the bread feels like a duty to eat, I am not happy. When it emerges fat-bellied and golden, slightly sour, miraculously perfect... then it is my deepest pleasure to sit with the heel of it in my palm - turning it over and examining the crust then chewing it unadorned by jam or butter to taste the real taste of bread. Slow bread that needs all the time I can give it. Well-noted.


Look at that beautiful bread! I love it. :)
ReplyDeleteYour bread is gorgeous! I wish I had the patience needed to make it.
ReplyDeleteThanks!
ReplyDeleteKaris Ann, it didn't happen overnight! I started with simple yeast breads and then just built up courage to keep doing more... I have definitely improved my patience by working with wild yeast!
Gorgeous loaf! My neighbor tried this last summer and was telling me all about it, especially the lengthy recipe. We asked ourselves why we do crazy things like in the name of eating, but we all know.
ReplyDeleteI took my starter out of the fridge yesterday morning and processed per the "Chad" method. He said he does it the night before and lets the leaven sit up to 16 hours. Mine has set 22 hours now. I need to go proceed immediately as I'm even more excited after reading your post! I'd love to see a pic of the cast iron pot you use to bake your bread. I don't have one nor a Dutch oven but want to invest. Our thoughts on bread are similar. Yes I'm a bread monger seeking that, as you say, miraculously perfect loaf. Wish me luck! I was going to speed things up and bake later today but will be patient and plan for tomorrow ;-)
ReplyDeleteLynn, I have 4 different ovens now - which seems excessive, but I love each one. I use my LeCreuset (which was a gift) for jam, jelly and soup - and jury rigged a heat proof handle before I invested in a new Lodge 5 qt. iron dutch oven that I use exclusively for bread. It was reasonably priced on Amazon for around 35$ with free shipping. There is a picture here, of a super-proofed loaf I made a while back. That one was a kneaded loaf that rose directly in a brotform. I do wish you good luck!!
DeleteThanks for the info. Nice the lodge oven is reasonably priced. Off to amazon ( or perhaps a quick trip to see what Tuesday Morning has) while my dough is in the bulk fermentation stage!
ReplyDelete