Flatbreads were the item of the month for the Sourdough Surprises bake along... and I couldn't have been happier since I've been meaning to convert one of my favorite pita bread recipes into a true sourdough version for quite a while.
Long before I ever baked a loaf of bread, I had started playing with flatbreads. Something about them is much less intimidating than traditional loaf baking; they are smaller things that don't require as much time or effort, and usually they can be baked in mere minutes. Part of this infatuation with pita in particular likely came from the bread-genius Mom of one of my friends. I clearly remember standing in her kitchen as she rolled out small discs about the size of your palm, telling me that "you want the dough to be the same thickness as your earlobe, that's how you can be sure they'll puff in the oven." Her oven was perpetually lined with blackened quarry tile (or maybe it was brick), and she'd deftly slap the pitas on there and we'd peer through the oven door as they rose. I did the same thing with these, my growing belly all of a sudden requiring me to grab a step stool to sit on instead of crouching or sitting on the floor for the several minutes of baking time.
I think this could also be the first sourdough recipe that I've made up entirely myself, basing the proportions loosely on a fast, favorite food processor version of pita that Cook's Illustrated published more than a decade ago. I used some pointers on Sourdough Home on how to go about converting, but instead of letting the dough ferment at room temperature, I let mine linger in the fridge until I was ready for it. My result was a sturdy pocket bread with a good, not-too-sour sourdough flavor. It's a keeper of a recipe for those times when sandwiches packed in bread need to travel well.

Part of the reason my bread was a bit more stable was that I recently read about pita on a Food52 post. The baker suggested rolling out the dough and letting it sit for a while until puffy, resulting in a pocket that was more uniform on both sides. Prior to this revelation, my pita was always thinner on one side, leading to leakage when the bread was stuffed. Let them hang out only the length of time it takes the oven to heat, and you'll be surprised at how "professional" your breads turn out!

I think this could also be the first sourdough recipe that I've made up entirely myself, basing the proportions loosely on a fast, favorite food processor version of pita that Cook's Illustrated published more than a decade ago. I used some pointers on Sourdough Home on how to go about converting, but instead of letting the dough ferment at room temperature, I let mine linger in the fridge until I was ready for it. My result was a sturdy pocket bread with a good, not-too-sour sourdough flavor. It's a keeper of a recipe for those times when sandwiches packed in bread need to travel well.
Part of the reason my bread was a bit more stable was that I recently read about pita on a Food52 post. The baker suggested rolling out the dough and letting it sit for a while until puffy, resulting in a pocket that was more uniform on both sides. Prior to this revelation, my pita was always thinner on one side, leading to leakage when the bread was stuffed. Let them hang out only the length of time it takes the oven to heat, and you'll be surprised at how "professional" your breads turn out!
I divide this dough into 8 pieces, making pita that is pretty substantial in size - about 7-8 inces across. Of course you can divide them into smaller portions to make more petite breads - just follow the rule of the earlobe thickness. It really works! Ordinarily I scale all ingredients for breads, but this one is casual enough (and you kind of know how soft and pliable a pita dough should be, right?) that I used conventional, non-weight measurements. Be sure to start the bread 12-18 hours before you want to bake the pitas.
Sourdough Pita Bread
yields 8 breads
For the sourdough "poolish":
For the sourdough "poolish":
- 1 c. 100% hydration starter, well fed
- 2 c. bread flour
- 1/2 c. whole wheat flour
- 1 c. water
- 1 T. olive oil
- 2 t. granulated sugar
- 1/4 c. plain yogurt
- 1 1/2 t. kosher salt
- 1/2 c. bread flour (plus 1/2 cup additional, likely)
When ready to continue (12-18 hours later), take the sourdough poolish out of the fridge and add it to the bowl of a stand mixer. Add the olive oil, sugar, yogurt, salt and 1/2 cup of flour and mix well. (You can do this by hand if you like, but it's easier in a stand mixer.) The dough will be quite sticky, and will likely need another 1/2 cup of flour as it is being kneaded. Knead for about 5-7 minutes until you can feel the dough turn soft and pliable. Turn the dough out onto a lightly floured surface and knead for a minute or two adding just enough flour to bring together a soft dough. The dough may still be a little tacky, and this is ok. (Try not to add too much flour so the dough feels soft rather than tight and dry.) Put into a clean container (I didn't bother to grease it), cover well with cling film, and let it rise at room temperature until doubled in size, about 3 hours depending on room temperature.
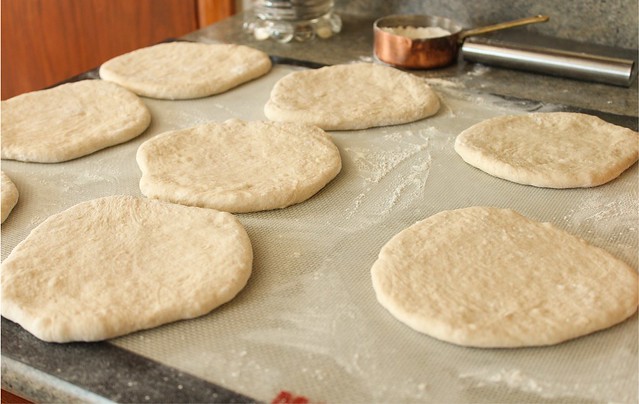
Turn dough out onto a lightly floured surface, and divide into 8 equal portions. Roll each portion into a ball, trying not to add too much additional flour. One at a time, use a rolling pin to roll each ball into a disc about 6-7 inches across. Aim for even thickness across the disc, that is about the same thickness as your earlobe. Let the discs rest on a lightly floured surface, covered by a clean, lint free cloth. Preheat the oven to 500 degrees with a pizza stone or unglazed tiles (a plain sheet pan in a pinch) in the center of the oven.
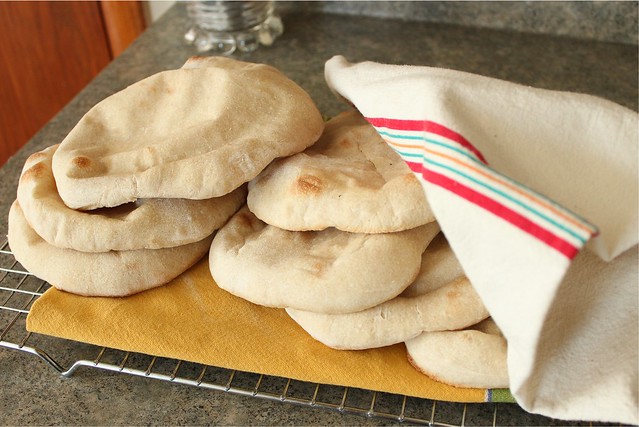
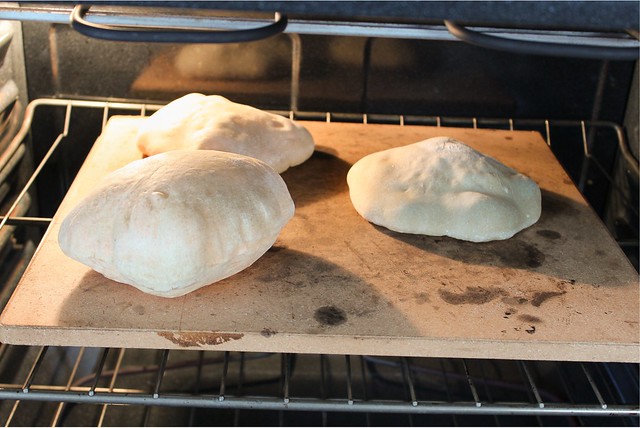
After the stone has fully heated, about 30 minutes, take a disc of pita and gently stretch it out slightly as it probably sprang back a little bit. The discs might feel a little tacky again as they rested, and that's ok; it's easier to take the side that feels driest and make that the bottom of the bread. You can bake as many pitas at once as your stone will allow - 3 or 4 for me - but I recommend baking one first to observe about how long it will take. It should be fully puffed and lightly browned within 5-6 minutes. After baking, transfer to a stack of towels. You may have to help the steam come back out of the middles - just let them rest for a few minutes, then gently and carefully (to avoid burning yourself) press down on them to flatten.
These breads are not quite as tender as the non-sourdough version, but I really enjoyed them. In fact, I had too much bread going around here this past week, and plan on turning the last few into pita chips today - which I figure will be a very good use for aged and sturdy pita breads.
Be sure to check out sourdough flatbreads from the many other Sourdough Surprises participants. There's sure to be plenty of inspiration!
Be sure to check out sourdough flatbreads from the many other Sourdough Surprises participants. There's sure to be plenty of inspiration!


Stopping by from Sourdough Surprise~ Your pita bread looks great! I also love you blog:) Can't wait to look around. Lynn H @ Turnips 2 Tangerines~
ReplyDeleteEarlobe thickness - maybe I should try that. I went for ruler thickness, and they puffed up well but weren't as substantial as I would like and tore easily. Also, dividing the dough up in wedges looks like an good way to get equal-size pieces, and is something I never thought of.
ReplyDeleteOh wow, awesome job!! Your pita looks utterly perfect! That is a great tip about rolling it to the size of an earlobe, haha, and letting it sit for a while. Awesome job making your own recipe, too! It looks like it turned out perfectly! Thanks for baking along with us this month!
ReplyDeleteGood tip about letting the pita sit a bit before baking them. They look beautiful!
ReplyDeleteI so wish I had chosen pitas this month - yours looks amazingly delicious. And the photo of the pitas on the baking stone is awesome. I love it!!
ReplyDeleteThese look perfect, great job!
ReplyDeleteOh wow, those look beautiful...nice job :-)
ReplyDeleteYour pitas look awesome! There are some great tips in this post too - I like the one about the thickness of your earlobe :)
ReplyDeleteOh, I love the idea of a sourdough pita! What a great way to use up the constant growth of a sourdough starter--and to have delicious pita with dinner or for sandwich-making besides. :)
ReplyDeleteLooks good! I love pitas sandwiches! It never dawned on me to make pita chips though! Yum!
ReplyDeleteThese look lovely. I rolled mine much thinner & they still puffed up, but I'll consider the earlobe thickness next time!
ReplyDeleteI think I can almost smell these! I'd stopped trying to get a pocket in my pita. Fortunately we're all content with ripping and dipping or folding and filling, but I can't wait to give these a try!
ReplyDelete