I was more than excited when Jeremy at Northern Brewer asked me to try making his yeasted beer bread recipe. Lately, I have been so obsessed with Christmas baking and one-pot meals that I feel that I haven't been overly creative when it comes to kitchen experiments. This experiment confirmed that not only do I love a challenge, I love to document the challenge and I love the feeling of usefulness that comes from helping out a fellow experimenter. I was also secretly glad that the dough was vegan, since I haven't posted anything vegan in a while!
Using beer to make yeast bread seems to be a natural fit. After all, the exact same type of fermentation is taking place to develop each. The recipe Jeremy provided me was pretty bare bones: flour, yeast, salt, a touch of oil, and beer. I used a spare IPA that has been in the far back of the fridge for awhile. It's certainly not my most favorite IPA, (I'd probably give that award to Three Floyds or Lagunita's) but for the purpose of carbonation and moisture in bread, it did just fine.

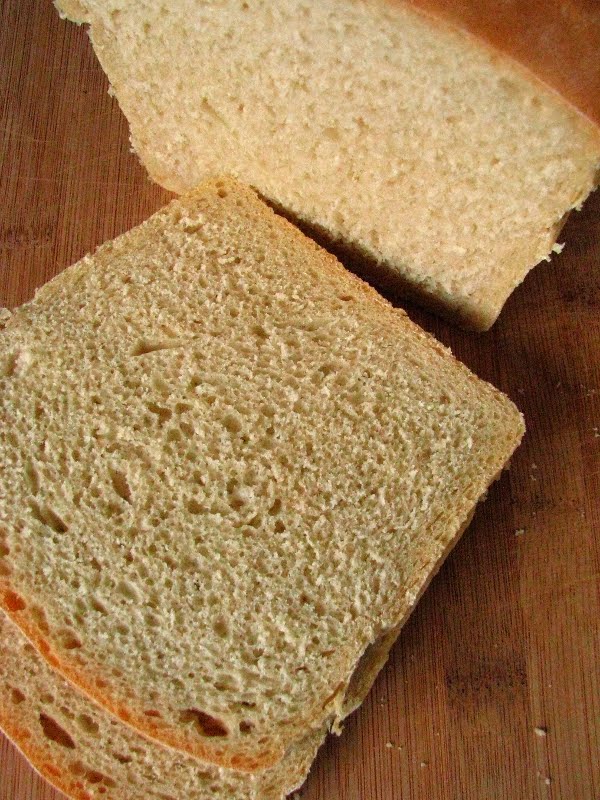
I have to preface this whole experiment by saying that in all of the breads I've made over the years, I have had none that had this much rise, and such a perfect interior crumb. It was soft, and golden brown. The dough felt smooth to work with and actually felt like it was carbonated. I could tell when I worked with it that it was going to be light, but wouldn't have suspected that it would be feather-light...
I used a basic method of straight-dough breadmaking, taking a few tricks from Cook's Illustrated. When I first started baking yeast breads regularly, I began with their American Sandwich Bread, which is just that: a standard, slightly sweet and fortified, white loaf bread. Applying the same technique to this dough seemed to work just fine.
The first thing I had to do with an ice-cold, refrigerated beer though, is warm it up. I didn't want to heat it on the stove or in in the microwave, hoping to preserve those carbonating bubbles. Instead, I ran some super hot tap water, and put the sealed bottle in a bowl of it for about an hour. The bottle felt warm to the touch, as did the beer when I poured it out.
I altered the recipe slightly to include a little more liquid and salt, and I mixed it in a stand mixer. You could easily mix it by hand, just increase the kneading time slightly. Basically, you want a smooth dough that isn't sticky to the touch. The finished bread has a bitter edge from using the IPA; even though I really liked it, I think I may add a tablespoon or two of honey next time to counteract. This bread makes a killer grilled cheese.
IPA Bread (a.k.a. Jeremy King's Beer Bread)
- 4 c. bread flour (I use King Arthur bread flour)
- 1 1/4 t. kosher salt
- 2 1/4 t. active dry yeast (or 1 packet)
- 1 T. vegetable oil (I used olive oil, and eyeballed it)
- 1 1/4 c. warmish beer, as described above
- up to 1/2 c. additional water or beer if needed
Preheat oven to 200 degrees. When the oven comes up to temperature, leave it on for 10 minutes, then turn it off.
Meanwhile, place flour and salt in the bowl of a stand mixer fitted with dough hook, and stir to combine. Open beer, and pour carefully (to avoid a "head") into a large measuring cup. Add oil to measuring cup. Have the additional water or beer ready at the side of the mixer.
With the mixer running, add yeast to the beer and oil in the measuring cup. It's going to foam up vigorously, so work quickly. Stir to combine and immediately pour into the running stand mixer. You should be able to tell within a minute or so if you need additional liquid, I used about 1/2 c. extra water. Continue kneading for about 5 minutes until a smooth, cohesive dough is formed.
Turn dough out onto a lightly floured surface, and knead by hand for a minute or so to shape into a tight ball. Place dough into an oiled bowl, turn to coat, and cover with plastic wrap. Place in preheated oven (which has been turned off), and let rise until doubled in size, 40-50 minutes.
When dough is finished with the first rise, turn it out onto a lightly floured surface and gently press air out. Aim to make a rectangle about 1 1/2 inches thick, that you can roll up into a loaf shape (so no longer than about 9 inches on one side). Tightly roll dough up into a loaf shape, and pinch the seam closed. Place dough in an oiled loaf pan with seam side down, and gently press dough into all the corners of the pan. Cover with plastic wrap (you can use the same piece that you used for the first rise), and place pan in a warm place to let rise for 20-30 minutes until dough almost doubles in size (this was about an inch over the top of my loaf pan).
Preheat oven to 350 when this is happening. (I typically put the loaf pan to rise on top of the stove, since it is pretty warm with residual heat from the oven.)
Bake for 35-45 minutes, until the bread is golden brown, and sound rather hollow when tipped out of the pan and tapped on the bottom. Temperature, if you choose to check it this way, should read at least 190 when thermometer is inserted in the bottom of the loaf.

Prior to first rise.

End of first rise.

At the end of the second rise, a finger poked into the dough should remain...


I let the dough rise in the pan to about an inch above the rim.

...and I took it's temperature to double check my done-ness. It was 192.7 f.

So there it is: a perfectly tall and domed yeasted beer bread. It was hard to wait for it to cool, but I was able to endure the time to confirm that the interior was tightly knit and perfectly uniform. I ate the heel straight away, unadorned, so I could get an unbiased taste. It was great, and it was actually beery - something that surprised me. It was great alongside the soup I made for supper last night, and toasts extremely well. I may have a new favorite loaf pan bread recipe...

I'm not sure if this technique would work with my sourdough method. I am curious if the beer would ferment happily along with the starter for 18-24 hours before becoming bread, or if it would become too alcoholic and kill off the balance of the sourdough culture. The only way for me to know would be to try (or Google, I found one already here)... I'm also wondering how the flavor would change if I used different beers, weiss beers may make a fruitier loaf, and syrupy stouts perhaps a more molasses-y one. More complex home brews are going to have more interesting results, no doubt.
Now that the newness of January is almost a week old, I can start to see where my new year is heading. While I don't envision myself becoming a full-fledged brewer this year, I can see myself tinkering around with more beer-based recipes. I like thinking that in times past it was probably the women of the households that were culturing, brewing, and fermenting things to feed and nourish their families. In our modern American world, the craft of home brewing is usually dominated by men. Where and when did this shift take place? Man, have I got a lot of reading to do... good thing it will still be Winter for a few more months.
The more I experiment with and read about, the more I realize just how connected all foodstuffs are. The people curious in general with food and drink tend to overlap, making us all better rounded in the long run. Good things to remember in the New Year!
The more I experiment with and read about, the more I realize just how connected all foodstuffs are. The people curious in general with food and drink tend to overlap, making us all better rounded in the long run. Good things to remember in the New Year!


This looks great, nice collaboration!
ReplyDeleteAlright, I'm totally waiting for you to master the sourdough beer bread. Now THAT would be delicious :)
ReplyDelete