Showing posts with label beets. Show all posts

Wednesday, April 29, 2015

More Cabbage? Genius.

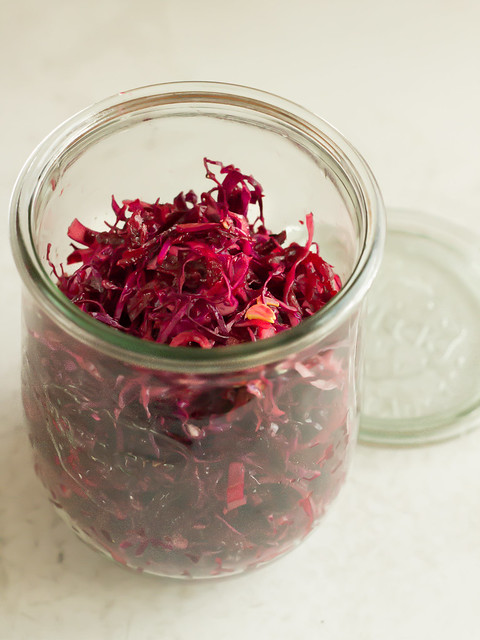
Mere moments after last weeks obsession with red cabbage slaw, I began reading a hard copy of Genius Recipes.  I missed the Fergus Henderson Red Salad when it appeared online a couple of years ago - and who knows, I might have overlooked it by not being completely obsessed with red cabbage at the time.  I'm only mentioning it because it is genius, as is the rest of the Kristen Miglore book which feels so good in the hands.  With 'gestures of balsamic' and 'healthy splashes of olive oil', it is exactly the right evolution from my red slaw when plated with Greek yogurt and candied jalapenos.  A short and sweet paragraph encouraging you to give it a go.

red salad.

Thursday, September 27, 2012

Daring Baker's Challenge September 2012: Empanadas

Patri of the blog, Asi Son Los Cosas, was our September 2012 Daring Bakers’ hostess and she decided to tempt us with one of her family’s favorite recipes for Empanadas! We were given two dough recipes to choose from and encouraged to fill our Empanadas as creatively as we wished!


I thought about this challenge a long while before actually beginning.  Our challenge was actually for the empanada gallega, which is technically more of a "casserole style" empanada.  But as I watched lots of Spanish-language YouTube videos of women folding the empanada dough deftly around fillings, I knew that I really wanted to try the individual, hand held empanadas instead.  I read over many recipes for doughs, noting that there were differences in those destined to house fried pastries and those for baked. 

Then, I had my first actual phone conversation with Deena - who I met in person this Summer, but I still somehow considered an "Internet friend" only.  All of a sudden, she felt like a real friend, someone to discuss food on the phone with.  I found myself wishing I still had the long, spiral-corded wall phone in my kitchen, the one that was easier to balance on your shoulder when doing the dishes and chatting.  She told me about the blog Laylita's Recipes, (after we talked about, and I remembered, these emapanda-related tuna and cauliflower versions that she made) and all of a sudden I was knew exactly what kind of empanada I would make, those filled non-traditionally with beets, Swiss chard, and goat cheese.

beet filling

I haven't made empanadas before.  I have made pasties, which are somewhat related - as are most pastry wrapped half-moons, I suspect.  To all of our neighbors south of us here in North America, emapanadas are an almost everyday food, a good way to use up a bit of leftover meat and veg (or even just cheese) in a maybe not so wholesome way, but in a very satisfying one nonetheless.

I think the reason it was so easy for me to decide on beet empanadas is because the wholesomeness quotient was certainly raised by using such high-nutrient vegetables as beets and chard.  I knew I'd be eating these alone, so I made just enough for me (and froze most of my dough rounds for another day).  I allowed enough extra filling to make a pizza for myself a couple of days later, and I just ate the last 1/4 c. of filling for lunch today alongside the last of my toasted rye bread and some salty Amish Swiss cheese.

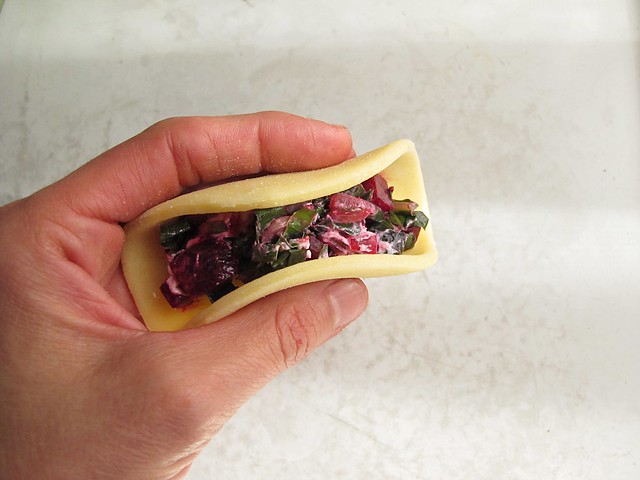
Making the filling is easy:  just saute some garlic and onion in butter or oil until softened somewhat, add a few leaves of finely chopped chard and some salt and pepper and cook it down until wilted.  Add to a waiting bowl of (roasted, cubed) beets, cool slightly, and crumble in enough fresh goat cheese to satisfy you.  The secret ingredient is some fresh oregano added after the cooking.  My goat cheese was a widely available brand with peppadew peppers in it. (Laylia's recipe is here.)

beet filling empanada

The dough we were provided for the challenge was a yeasted dough, but I wanted a quicker dough, with some fat but not so much that the pastries felt greasy.  Since I was so excited about Laylita's Recipe blog, I decided to just try her dough as well.  A full 6 oz. of butter was perhaps more than I though necessary for a "healthier" empanada, but I decided I wanted to splurge.  After all, I've never made empanadas before... and it felt like a bit of a celebration.  I rolled the dough to about 1/8 of an inch thick, which felt a little on the fat side, but I saw why as I began to fold the edges.

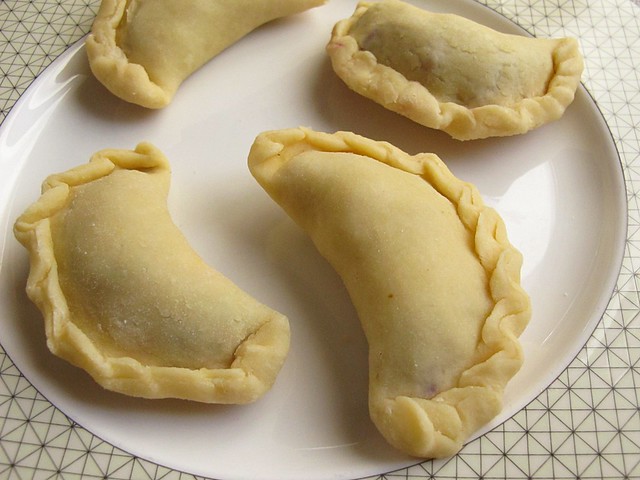
I moistened the edges of the dough with water and pinched them together as I saw in so many videos.  After pinching, which really flattens the outer edge, you start back at the beginning and fold a crimp down the length of the curve.  (Here is a favorite video, you can see her folding over the crimp at 2:35.)  By the fourth try, I had it down, and that one was easily the prettiest one of the bunch.  It's the one on the lower right:

empanadas
Laylita recommends filling the empanadas, then letting them chill for 30 minutes prior to baking. 

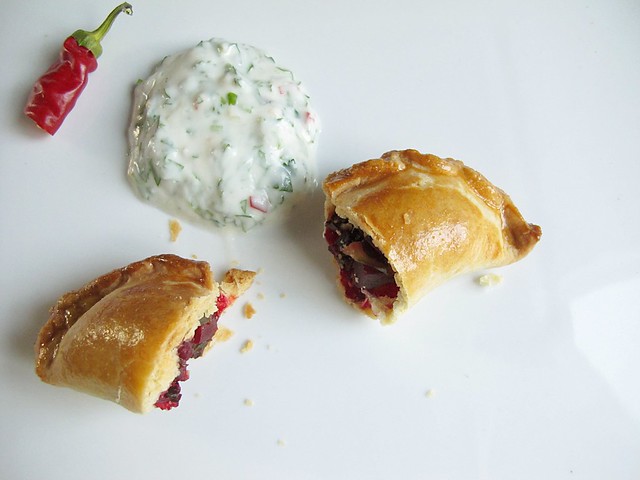
I made (and ate in one sitting, mind you) just 4 empanadas, technically empanaditas since they were a scant four inches across.  I even baked them efficiently in my little toaster oven.  After brushing them with a beaten egg, I beat another egg and that's what my son ate for dinner.  As they baked, I quickly made a sauce, also based on how Laylita ate hers.  To some whole milk yogurt, I added some minced garlic, a whole fresh cayenne pepper from my garden, a large handful of minced cilantro, lime juice and some salt and pepper.  The spicy dipping sauce was what made eating them feel more like a meal and not just a snack.

empanadas (2)

I ran out of time to make another, more independently inspired batch of emapandas.  I do have two very small leeks and some ancho peppers from my garden, still sitting out on the counter.  I intended to have them sauteed and added to some cheese to fill 4 more rounds that still sit well covered in plastic in my fridge.  Maybe tomorrow.  I also saved the scraps from cutting out the dough rounds and rolled a single 7-8 inch round that I thought I could top a pot pie with... but there is just so much appetite in a week!  Fortunately, pastry dough does tend to keep well under refrigeration for several days, and in the freezer even longer.  I'd say that the 6 oz. of butter is going a long way as well.

empanadas (3)

Be sure to have a look at the Daring Baker blogroll for other empanada inspirations, and at the original recipes that Patri provided us!  Even if I (once again) didn't follow instructions, I had a great time making something I've never made before!

Monday, June 4, 2012

Beetific!


sliced beet gratin

It's early beet season here in Wisconsin, and I ate this ridiculously good gratin made with both the beetroot and healthy green tops yesterday (and today) with particular delight. You can read more about it on the Becky-Home-Ecky blog I write on Milwaukee Magazine.

My enthusiasm for all things beety had me thinking about some beet heavy recipes from my past. Bright pink beet pasta, tender Indian spiced beet "chops", whole beet risotto... so much good stuff I've made - and new stuff that I've found to make soon - that I thought a short link list of beetific recipes would certainly in order!

Here are some past favorites:

Beet Pasta (with a shockingly simple Blue Cheese Sauce to eat it with)
Beet Chops
Beet and Beet Green Risotto
Beet Gnocchi
Vegan Beet Stacks with Cashew Ricotta Cheese
Chocolate Beet Cake


chocolate beet cake
I definitely need to make this cake again...

Whenever I see something made with beets, I mentally warehouse it. Here are just a few recent perusals that I should get around to making this year:

Whole Beet and Lemon Galette (Three Clever Sisters)
Maple Horseradish Glazed Beets (LeFort Urban Homestead)
Ginger Spiked Pickled Beets (Food in Jars - the Cookbook)
Beet Ice Cream with Orange Zest and Poppyseeds (CosmoCookie)
Jamie Oliver's Smoked Beets (via Food52)

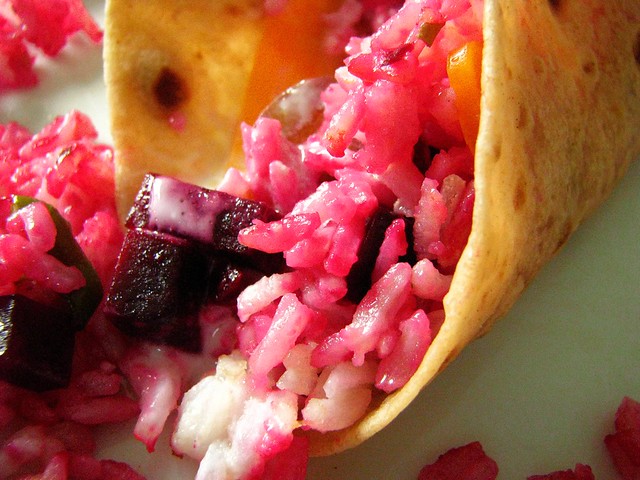
casa rcakewalk beet escabeche taco
beet escabeche tacos: concocted with roasted beet, leftover rice, canned escabeche...

Regardless of actual recipes, I will remember a favorite technique my friend Elisa was doing a couple Summers ago: roasting beets, then marinating them in a canning jar with a little feta, balsamic vinegar, maple syrup, olive oil, salt and pepper. They were ready for salads (or just to pop in my mouth plain from the jar) for up to a week, if I could keep them around my fridge for that long. This Summer, I'm making this a fridge staple once again.

I hardly need inspiration for beets, but sometimes it's good to have a reminder of good, beety things. And sometimes, it's good to share beety ideas with people who actually love beets as much as I do. Do you have a good recipe for me to try? Leave me a link in the comments, and I'll add it to my Summer Beet List!

Monday, September 12, 2011

Everything's Rosy.

About a year ago I read somewhere about a woman who said that she likes to wake up at least a half hour before her household. Thirty minutes hardly seems like enough time to accomplish anything, but recently I have successfully implemented this myself - even if it requires me to be ripped from my sleep and dreams, and even if it makes me feel blurry eyed for several minutes before actually getting out of bed.

For the past 5 years, I have not really set an alarm. We got up when we woke up, I got up actually when the Kiddo woke up since I am rather night-owlish. But getting up at the crack of dawn isn't really so bad. This morning, I had already thrown in the first load of laundry and prepped some beets to roast before my son was even poked gently awake. My entire morning seemed rather pink after dropping him off at school. I walked in the door, (washed my hands), and took the roasted beets out of the oven. It's our last hot day, and I had the oven on early so I could welcome Fall tomorrow with beety fresh baked goods.


When they were cooling, I ran the Watermelon Jellies down to the basement shelves. I made two batches over the weekend using Marisa's recipe, one plain and one with fresh cayenne peppers. I have never made watermelon jelly before, but I have to say that it has grown on me. Especially the cayenne version. I am most excited to make some crackers, get some good sheep's milk feta, and enjoy this warming sweet melon flavored jelly to it's full capacity. I tried the skimmed off foam on frozen scones, and was appropriately amazed. Watermelon Jelly is completely worthwhile and deserves a place on the jam shelf, and don't let anyone try and convince you otherwise!


I also strained out the elderberry vinegar. It had been sitting for several days (I've lost count), but tasted well rounded and earthy so I figured it was time. Using the workhorse nut milk bag, I let it hang for about a half hour before squeezing the pulp nearly dry. My hands briefly stained light purple, I measured the finished vinegar at 4 cups. Using the same method as the Cherry Vinegar (which was adapted from Pam Corbin's Raspberry Vinegar), I added 1 c. of sugar for each cup of vinegar and warmed it just enough to completely dissolve the sugar so that my cider vinegar remained raw. It is lovely. I have the jars bottled, labeled, and transferred to the basement shelves. I just drank a couple of tablespoons over ice, diluted with seltzer water, and it is fantastic. But since elderberry seems to be more in the medicinal family than the gustatory one, I'll be sure to curb my consumption. However, drinking 2 T. a day throughout cold and flu season seems like it could be very easy to do.


I peeled the beets, and pureed a couple of them. When looking up the link for the Ground Cherry Hot Sauce I made last week, I ran into a beet doughnut recipe that Sarah Nett posted. They were baked doughnuts, and I have not made dessert over here in what seems like forever (in reality, it has only been a week or two). In the back of my mind I thought perhaps I could make these camouflaged enough that my boys would both eat and love them, but after trying them, I'm not completely certain they would be fooled.

I love the flavor and color, but the texture needs some work. Had I baked them in a doughnut pan (I don't have one), I think they may have worked better actually, since the texture did remind me of doughnuts. Making them as muffins instead left the bottoms slightly gummy - and I suspect I should have added a bit more flour or leavener.

If you are a baker, will you take a look at my recipe in progress and give me a couple of suggestions? I have a feeling these could be fantastic with a tweak or two...


WORK IN PROGRESS Beet Muffins (adapted from My Culinary Sanctuary)
  • 1 c. AP flour
  • 1/2 c. whole wheat flour
  • 1 1/2 t. baking powder
  • 1 t. cinnamon
  • 1/4 t. nutmeg
  • 1/4 t. salt
  • 1/2 c. pureed beets
  • 2 eggs
  • 1/2 c. brown sugar
  • 1/2 c. yogurt
  • 1 t. vanilla
  • 1 T. vegetable oil (I eyeballed)
Preheat oven to 350. Line a muffin tin with papers, or grease them well.

Sift dry ingredients together in a large bowl.

In a medium sized bowl, beat eggs with brown sugar for several minutes, until the sugar is partially dissolved. Mix in yogurt, vanilla and oil, and beat well.

Scrape the wet ingredients into the dry ingredients, and mix well by hand, but do not overmix. Portion into the waiting muffin tin.

Bake for 25-30 minutes until a tester comes out clean.


slightly gummy.

I am not about to give up on these beet muffins. On looks alone, they have captured my Autumn-ready heart. I glazed them using a quick doughnut glaze that I remembered loving from the Daring Baker Donut Challenge a while back. I eyeballed small amounts into a little bowl and stirred it with a spoon. After dunking the photographic one, I just spooned a little over each. (I am frustrated with my favorite muffin papers. They used to be amazing and non-stick and now the only thing they have going for them is that they are compostable...)


So I feel productive and maybe a little less lonely on this second Monday of the school year. I'm saving my yard work for tomorrow when our weather will quickly turn to more Fall-like temperatures. My morning went fast, which I know is how these school years will go.

Please remember if you have an idea for these muffins to let me know. Could it be that they need a stick of butter? When I'm so tired tonight from getting up so early, I'm sure I'll be wide awake thinking about how to fix them.

Friday, June 18, 2010

Tiny Beets: First CSA meal of the season.


Yesterday, I got my first ever CSA box. I decided to join a CSA last fall, when I was both frustrated with my shade-filled garden and impressed with Highcross Farm produce at the farmer's market. I did follow through on filling some raised beds in the middle of my sunny backyard, and have tomatoes, eggplants, peas, lots of peppers and assorted herbs finally doing very well so far thanks to unobstructed views of the sun and all of the rain we have been getting lately. I know I've mentioned before that when I first moved to the city, I used to feel strange getting my summer produce from strangers at markets. Growing up, we always had a huge garden, and it was something I never realized was so precious until moving away from home. I've always had some sort of little garden going, but not really a big enough one to eat a whole season through.


I think I'm really going to enjoy my CSA. I know I was already impressed with what arrived in my small box yesterday: pac choi, green lettuce, chives and oregano, 4 stalks of rhubarb, and a bunch of tiny beets along with another basil and tomato plant for the back yard.

It is early in the season, so when I say "tiny beets" I mean really tiny. There were three little beets in the above bundle, weighing in at just over 2 ounces without their tops. I decided that 2 oz. of beets plus their greens would be a good amount for my lunch, so I decided to veganize a recipe I saw on innBrooklyn: Beet Chops.

I kind of thought I would save the recipe for my Vegan Monday post, but I just can't since it was so tasty. I used a slightly higher proportion of russet potato to beet, and altered Indira's cooking methods just a little, but the effect was truly great. And lest you think I'd toss the gorgeous beet greens, I sauteed them quickly in olive oil to make a bed for the chops.

The result is a pretty, pink dish, glamorous enough for a dinner party, and elegant enough to make me feel special for cooking it just for myself. I recently read Judith Jones' book The Pleasures of Cooking for One. I have to say, it is probably one of the best reads I've had in a long while. There are many reasons one can be driven to cook for the self, some are sad and lonely reasons, and some are fueled by experimentation and curiosity. Weather I am sad or lonely, curious, or am the only beet lover in my household, I certainly love to cook and don't need much prodding to make a mess of my kitchen for no other reason than to just please myself. It is only an added joy to be able to sit at the table and think to myself, "This is REALLY good".


The original recipe calls for equal parts beet and potato, but I had very tiny beets, so I upped the russet ratio. Indria also dredges the chop in egg to help the bread crumbs to stick, but since I was making a vegan version, I omitted this and just lightly pressed the bread crumbs into the sides. I make my own bread crumbs from my leftover bread, so I know that they are vegan. You could experiment with panko crumbs, or even corn flakes, and discover a tasty variation.

Beet Chops (adapted from Indria on innBrooklyn)

Serves one, but proportional enough to easily accommodate more servings.
  • 2 oz. beets, boiled and mashed
  • 5 oz. russet potato, boiled and mashed
  • 1 small onion, minced
  • 1 clove garlic, minced
  • 1/8 t. turmeric
  • 1/8 t. garam masala
  • 1/8 t. chili powder
  • 1/4 t. cumin powder
  • salt and pepper to taste
  • bread crumbs for dredging
  • vegetable oil for frying
  • beet greens from the beets, coarsely chopped
  • olive oil
Boil the beets and potatoes separately since they cook at different rates. (Reserve some of the cooking liquid just in case.) I mashed them together in the same bowl. Meanwhile, saute onion and garlic in a bit of olive oil until translucent, about 5 minutes. Then add spices, salt and pepper, reduce heat, and stir until onions are soft, another 3-5 minutes.

Add onions to mashed potato/beet mixture and stir together well, adding a bit of reserved liquid if the mixture is too dry. Form the mixture into 6 "chops", I made mine rectangles. The mixture is soft, like a fragile play dough, so work carefully.

Press the chops into the bread crumbs gently, so that all sides and ends are evenly coated. Heat some vegetable oil, about 2 tablespoons, in a non-stick skillet over medium high heat. When oil is hot, carefully add chops, and cook about 1 minute per side until all 4 sides are lightly browned and crusted. (I actually used my hands to add them to the pan and flip them, since they are pretty delicate, just be careful of the heat.) When the last side is done, turn off the heat and saute the beet greens.

Heat a little olive oil over medium heat, until hot but not smoking, and add beet greens. Toss with a bit of salt and pepper and saute until cooked to your liking, about 2 minutes for me. Serve the beet chops on top of the beet greens.


Homemade bread crumbs: I seasoned these with salt, pepper and a bit of onion and garlic granules - but I usually leave them plain.


I had tasted the beet/potato mixture prior to pan frying, and knew that I loved the flavor, but I was pleasantly surprised at just how delicious the hot beet chops were. I really love Indian spices, and it really works with beets - I don't know if I'd ever had anything similar before! They almost melted under the weight of the fork, and were amazingly "beety" for only having a mere 2 ounces of beets. They were also a cheerful color:


The best surprise of all, is that while I chose the 3 chops that were most "photogenic" to plate up first, it was the 3 that got slightly charred that tasted the best. It was accidental to be sure, since I have an electric stove, and the "Genuine CalRod" coils always tilt my pans slightly to one side no matter my rigging it seems. I guess, if I had a deeper coating of oil, all my chops would have been rendered more blackened and crispy. However you choose to alter the recipe, I'm sure you will enjoy your result...


...provided you love beets, of course. If you do, and find yourself in the position of cooking for only yourself, whatever the circumstance rejoice in the fact that there is no right or wrong, there is no one you need to impress, there is just the simple joy of standing over your stove and tinkering with a dish that will no doubt bring you the greatest reward.

Sunday, June 6, 2010

Beet Gnocchi. Enough Said.


This is only the second time I have ever made gnocchi. Or eaten gnocchi. A few years ago, I was watching Mario Batali make it on the Fine Living Network, and I had a revelation. He made it look so easy! Like I should just be able to do it tonight, while conversing with friends over a glass of wine. I also discovered during that Molto Mario episode, that I personally owned a gnocchi paddle. My Mom had given me a bunch of kitchen tools, probably from an auction or rummage, and among them was this paddle. When I had limited wooden utensils, I tried using it to stir and couldn't fathom why it would have grooves. It seemed like the worst idea ever for a kitchen implement. It spent a long, lonely decade in the bottom of a drawer before, fortuitously, Mario showed me it's intended use, and thanks to his enthusiasm, I went right from the couch to the kitchen and made my batch. After all, if I had this neglected piece of kitchen software, I may as well put it immediately to good use.


InnBrooklyn's Veg of the Month Club selection this month is beets, and I felt a particular inclination to outdo myself, since it was my beet pasta experiment that first attracted them to CakeWalk as readers and now to me personally as "froggers" (friends+bloggers). I actually was acquainted with them first through a connection at flickr, and ever since I feel like I'm chatting with old friends when we write (or now Skype) on a fairly regular basis. I feel renewed in my creativity since joining forces with them for LIFEyear, our 365 photography project, and am really happy that I was able to forge such a meaningful connection with people so far away, that I would never have met if it weren't for the Internet!

I also personally wanted to try making gnocchi again; my first attempt with plain russet potato was alright, but far from perfect. Since I really had no way of knowing, I made the dumplings, and then let them sit covered at room temperature for several hours until I boiled them. I've learned since, that if you don't intend to boil them right away, you should freeze them in a single layer on a sheet pan, and then pull them directly from the freezer and introduce them to the boiling water when needed. I'd say I'm still a ways off from perfect gnocchi, but at least I'm having fun and gleaning a bit of extra nutrition along the way.


I used Mario Batali's recipe for gnocchi, but used 1 part beet to 2 parts russet potato. I also opted for roasting the beets and potatoes, to preserve the color in the beets - boiling tends to wash them out.

To roast the beets and potatoes, preheat oven to 375, lightly coat them (unpeeled) with olive oil, and let them stay in there until a piercing knife yields very little resistance. The beets will likely take longer, so start them 20 minutes before adding the potatoes. When they are done, cool them just enough so that you don't burn yourself when handling them, and then scrape off the skins. You'll want to rice them (or finely shred them) when they are still warm, but more on that below.

Beet Gnocchi (adapted from Mario Batali) with Brown Butter and Crispy Lemon Thyme

makes 4 main courses or 8 side portions, but I suspect this will vary with your state of hunger.
  • 1 lb. beets, roasted
  • 2 lbs. russet potato, roasted
  • 2 cups, AP flour (plus additional for rolling)
  • 1 egg
  • pinch of salt
When potatoes are roasted and peeled, use a ricer to finely grate them onto a clean sheet pan. (I have no ricer, but one is now on my list! I rub them through a fine stainless sieve which works well.) If you have a ricer, it may be strong enough to rice the beets, but since I don't, I cut them into large chunks and processed them finely in my food pro. Then, I added them on top of the potatoes, and let them cool slightly.

Mound the beets and potatoes together to make a brilliant pink mass, sprinkle liberally with about a cup of the flour and a pinch of salt, then make a well in the center. Crack in the egg, and beat well, adding more of the flour to the egg and then mixing it in well with the egg. When you have a dough forming, knead it by hand gently into a ball, continuing to add flour as needed, until you have a relatively smooth ball that isn't too sticky.

Have two sheet pans lined with wax paper or parchment paper ready. Cut off small portions, and roll into long "snakes" a little larger than the diameter of your thumb. Use plenty of flour (I found that I actually kneaded more flour into the small portions prior to rolling them out into snakes), to keep them from sticking. Using a sharp knife, cut them into 1 inch portions.

When you have a "snake's" worth of dumplings, roll them across the gnocchi paddle or the tines of a fork. (A good explanation of how to do this: here.) Dust the resting gnocchi with flour if they are sticky, and keep them in a single layer. If you are making them for later, freeze in a single layer, then transfer them to a jar or zip top bag and store in the freezer.

Bring a kettle of water to a boil, and add a bit of salt - as if you were cooking pasta. When the water is at a rolling boil, add gnocchi. (Mario has a bowl of ice water standing nearby to stop them from cooking as you remove them. I will remember to do this step next time! Mine were a touch sticky since I didn't.) When gnocchi floats to the top, remove them from the boiling water using a slotted spoon and plunge them into the ice bath. Let them sit there for a minute, and then drain. Mario tosses them with oil to hold them, but I did not since I made browned butter.

Browned Butter with Lemon Thyme
  • 3 T. unsalted butter
  • 3 or 4 sprigs of lemon thyme
In a small saucepan, heat butter over medium heat until it begins to foam. Add thyme (it will crackle and spit at you), and continue to heat until the butter turns brown. Watch it carefully or it will burn. Spoon the butter over the finished gnocchi, and garnish with crispy thyme.


I wasn't sure what to expect when I took the first bite of hot beet gnocchi. Since I had neglected to do an ice bath, they were a bit sticky... Happily, they tasted terrific with a deep, beet-y flavor, and a very dumpling-esque texture. I had a gnocchi expert for dinner, since Sasa grew up eating it, and she told me that the texture was good, so I'm taking her word on it. I really don't think I have ever eaten gnocchi anywhere, so I have some more homework and experimentation to do. If anyone has a good recommend of any Milwaukee area restaurants making exceptional gnocchi, please let me know so I can go and eat it! I feel like I should have added more flour to my dough, but found myself likening it to egg pasta dough, which definitely can not be an accurate comparison.


Since I heeded Ina Garten's advice of never cooking anything you have never cooked before when you are having company for dinner, I had a fresh loaf of bread and a big slow cooker full of shredded Italian Beef ready before I even brought my kettle to a boil... and Sasa told me that in Croatia, they always had gnocchi with a beef sauce kind of like a goulash.

She easily convinced me to experiment with a portion of plain, un-butter-sauced gnocchi. We heated a pan over medium heat and added a tablespoon or so of leftover browned butter. Then, I made a roux by adding an equal amount of flour and stirring it for about a minute. I added maybe a half of a cup, all told, of warm water, and continued stirring with Sasa adding salt, aleppo pepper and finally, a good amount of sweet smoked Spanish paprika. Lastly we stirred in a heavy cupful of shredded beef and let it turn into a sauce:


I grabbed my camera, and she told me that maybe it wasn't the most photogenic thing. I agreed, but was it tasty! We all mixed everything together as we ate, grating Parmesan cheese over our whole plates, and devouring all but about 11 little gnocchi. It was suspiciously quiet during dinner, so I know that it is certainly a meal that I would make again, and hopefully soon, since I only cooked half the amount of beet gnocchi that I froze.

I may be hesitant to join more organized groups, but I have to say I really like participating on a whim to "round-ups" such as the Veg of the Month Club, and Buttermilk Party Cake's Elevenses sweets. I do think that it forces me to be creative in my kitchen, if for no one else, then for myself. My Husband detests beets, and they are one of my favorite things, so I was very happy to have fellow beet lovers to enjoy my hard work with. If you love beets and have a beet recipe you want to share with others, consider submitting it to innBrooklyn before May 9, 2010. I know I'll be eagerly searching their results on the 10th for my next beet adventure!
Tuesday, May 18, 2010

Excitement: Somehow it always includes Beets.

So in my recent obsessions with all things vegan, I got the book The Conscious Cook by Tal Ronnen from the library last week. It, of course, is now in my Amazon cart. In addition to lovely recipes, it has great photography and great layout, and is full of inspiring fresh recipes. In reading it cover to cover, I discovered that I was so curious about his "cheese" made from cashews, that I could think of nothing else. In his book, Tal makes Cashew Creams (you can find the recipe on his website) and also cheeses made from nuts that are kind of related to the Cashew Creams. His recipe for Beet Ravioli with Balsamic Pickled Figs and Green Garlic Oil was the one to really pique my interest, and a couple of days ago I decided to embark into the world of vegan "cheese".

His approach is to soak cashews overnight, then blend them together with probiotic powder and let them culture at warm room temperature for 12-14 hours. Now, dear readers, you know that I have a serious addiction to obsessions, when I was so curious about this, that I had to drop $26 at Outpost for the New Chapter Probiotic All-Flora capsules that this culturing project required. I wavered in how much I wanted to try this just a little bit, before giving in and just buying it. After all, I feel like I haven't been buying so many groceries lately, and giving $26 extra of my grocery fund to Outpost is not really a bad cause. I wasn't disappointed in my decision.


I am absolutely glad I parted with my USD's, since the result of this cashew "ricotta" as I'm calling it, was wonderful. I used my immersion blender to puree the cashews and water, and was not able to achieve absolute smoothness, but the flavor of plain, soaked and blended cashews was nice enough that the bit of grainy texture didn't bother me at all. In fact, I thought it tasted exactly like the texture of ricotta, and could see the finished product taking on all of the "cheese-ness" of cheese, sans cheese of course.

The state of the plain blended cashews prior to culturing wasn't all that different either, so if you feel that you can't part with $26, I'd say to go ahead and make it (skipping the long culturing time) anyway! Meanwhile, I used my savvy kitchen math to realize that my 6 capsules that went to inoculation purposes cost me $2.60, and that is affordable for the sake of experimentation! If nothing else, I can pop 80 cents worth of probiotics down my gullet every day for the next month and be proud of my healthfulness - but I'm sure I'll use more of my capsules to try some others of Tal's cheeses. I also didn't measure any of the added spices, I added to taste. No wonder why I love vegan cooking so much!

Tal Ronnen's Cashew Ricotta Cheese
  • 2 cups raw cashews
  • 1 t. probiotic powder (from 6 capsules of All-Flora, or another comparable quality powder) dissolved in 1 cup of warm water.
  • 2 T. nutritional yeast flakes
  • 1 1/2 t. onion powder (I used granulated onion)
  • 1 1/2 T. minced chives
  • 2 T. minced parsley
  • 1 t. sea salt
  • black pepper
Put cashews in a bowl, add cold water to cover them, and refrigerate 12-14 hours. Drain and rinse them under warm water.

Place nuts in a blender with the probiotic powder and water mixture (I used an immersion blender), and blend until very smooth. Transfer to a clean, glass bowl, and let sit at warm room temperature (I leave the oven light on in the closed oven) for 14-16 hours to culture.

Transfer to a medium bowl, and stir in remaining ingredients. Cheese will keep for a week under refrigeration.


This morning, after a night of chilling, I took to doctoring up that cultured cashew cheese into a proper "ricotta" filling. Onion granules, nutritional yeast flakes, some fresh chives and parsley from my yard, and a bit of salt and pepper, and I was completely fooled at how delicious the taste of this was, and that it did indeed taste like ricotta cheese. (Before mixing up the savory version, I saved out a cup portion to play around later with some sweet applications... I have it in my mind that I can make a cupcake frosting out of it!)

I departed from Tal's original recipe here, since I did not make the green garlic oil, and forgot to buy figs during the Probiotic Powder shopping trip. But I was glad, since my result was so good, I was nearly jumping up and down. So many times if you spend a lot of time and effort (and those USD's) on something, the result is not up to your expectation. What a happy surprise to know that I will make this again and again!


I still had my borrowed mandoline (that I have to return), so I sliced a peeled beet very thinly. I ate a slice of raw beet, and then got out my steamer. This is no Raw Vegan recipe, now... but I'm so glad I steamed them, since they got tender enough to resemble pasta, and were easy enough to cut with a fork and gobble down. Boy-O and I spent the morning at the library, and because he was so consumed with a book on Stingrays, I got to peruse my cookbook aisle. I fortuitously plucked Eat, Drink & Be Vegan by Dreena Burton from the shelves, and found a dressing that I decided would be good for the top of my creation, a vinaigrette made from balsamic and maple syrup. Dreena's book has many great recipes, and I'm looking forward to looking over it more completely later today. I also noted that she is a blogger at eat, drink & be vegan, so I'll be adding her to my feedly, no doubt!


I have no idea why I never thought of combining balsamic vinegar and maple syrup, but I'm more than excited that I did. I used equal proportions of each, and it was almost candy-like. I made a very small amount, but it is so easy to double or triple that you'll hardly need to use any of your kitchen math!

Balsamic Maple Syrup Vinaigrette (adapted from Drena Burton)
  • 2 T. balsamic vinegar
  • 2 T. maple syrup, preferably dark
  • splash of extra virgin olive oil
  • salt
  • pepper
That's it. Blend it up.

Assemble the little stacks or "raviolis" however you wish, obsessively try to get a good photo, and then eat them up! Next time, I will make this more of a meal and have a pretty green salad underneath, but for my lunch for one, a whole steamed beet, and maybe a healthy 1/4 cup of this ricotta cheese was really satisfying.


I know I shouldn't be surprised at how contented I am eating simple whole foods that have little or no cooking. I guess, it doesn't surprise me at all that I'm so excited about my new vegan obsessions, since I do know that often it only takes a little push in any given food direction to send me off and reading about something different to me.

innBrooklyn is hosting another installment of Veg of the Month Club, due on June 10th, and the veg for this go around is beets. I have more beets in the fridge, and I didn't consider using this recipe for the Club submission, but I just may, since I loved it so much! Nothing says "excitement" to me, like beets, so I'm looking forward to seeing some good inspirations there.

Saturday, March 6, 2010

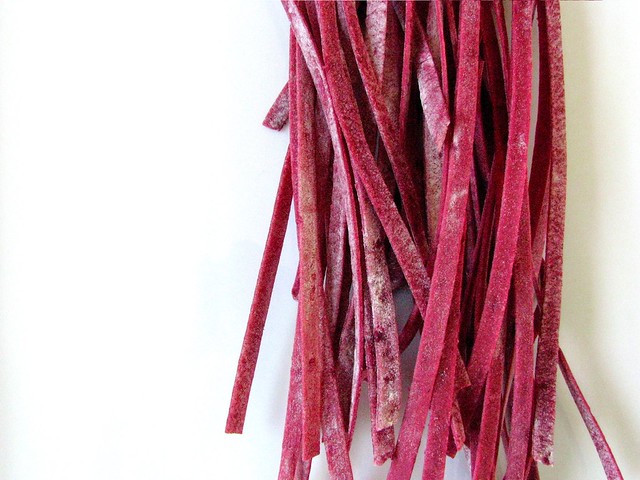
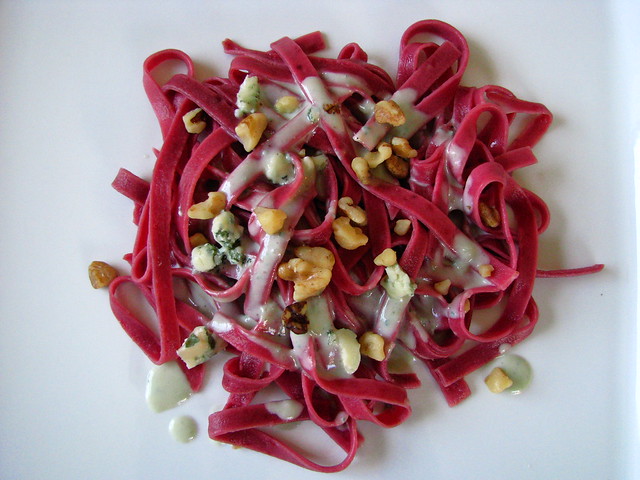
(Finally,) A Companion for Beet Pasta: Blue Cheese Sauce

beet pasta

Sometimes, I need a bit of prodding to complete a project. I've had this beet pasta in my deep freeze now since September, in part since I was hoping to share it was someone as passionate about beets as I am. I unearthed a portion for lunch today, and finally completed a sauce worthy of vibrant fuchsia noodles: a blue cheese sauce.

I had this sauce in mind since the noodles were first birthed, but when I ate them originally, I was absolutely contented to eat them with a bit of butter and salt and pepper. Indeed, the blue cheese sauce is "gilding the lily" so to say, since homemade noodles are always worthy of "nakedness" in my book, but sometimes the deep flavor of blue cheese is worth eating on almost anything. The pure beauty of this sauce is that it would also be a welcome addition to salad or roasted broccoli just as easily as it is added to the top of these noodles. A plain, raw carrot would be as fortunate for the introduction as would some fried cheese or spinach salad. The possibilities are endless, and I'm glad the prodding resulted in the concoction!

Blue Cheese Sauce for Beet Pasta

Because this sauce is so easy and mathematically proportional, I am giving you the amounts I made for about a 1/2 cup of sauce. It is easily doubled, tripled or quadrupled - depending on how saucy you like things! Any extra you have won't last for long, once your imagination gets going.

  • 2 oz blue cheese (I used Wisconsin's Mindoro Blue Gorgonzola, but any type of strong or mild blue or bleu will do)
  • 2 oz half and half
  • 1 T. flour
  • Kosher salt
  • black pepper

Combine and stir half and half and blue cheese in a skillet and heat over low heat until the cheese melts into the milk. When the mixture is nicely warmed and melted, add a tablespoon or so of warm milk/cheese mixture to the tablespoon of flour and stir to make a smooth paste. Whisk the paste into the milk/cheese mixture and turn up the heat a bit until the mixture thickens. Remember that the mixture will also thicken more as it cools. When properly sauce like, turn off the heat and season with salt and pepper. The sauce will have a blue-cheeseish hue, but is cleverly disguised by the vibrancy of the pink noodles. Garnish with toasted, chopped walnuts, and additional crumbled blue cheese if desired.

beet pasta

You may be able to omit the flour if you use a heavy cream instead of half and half, but personally, I always have half and half on hand and need to add heavy cream to the grocery list. The flour roux does thicken the sauce nicely, and the texture is delicious in my opinion.

A pretty posh lunch, I'd say. And the funny thing is that it seems posh, but really takes no time at all, especially when you have the pasta frozen and waiting for you. Not a bad thing to be able to pull out of your sleeve - especially, say, when eagerly anticipating a marmalade canning, food blogger joint project later in the month!

Tuesday, December 29, 2009

The Best of 2009: Personal Food Photography Favorites.

I think when I look back, the whole reason that I started food blogging was because I was taking all of these food pictures, and I was only showing them to the same 3 or 4 people. I've loved my kitchen for quite a few years, but only somewhat recently entered the digital age of photography. I like to think that I know what's going on with technology, but yet really, I'm in the dark ages. Until I got married, I never even had a computer in my home, and most people were surprised at how many computer-related things I knew for really not being all that interested in them.

A few months ago, we had to invest in a terabyte of extra storage, since I was taking thousands of photos in super high resolution. It seems ironic that food photos were eating up tons of space. I've since started shooting in smaller formats, but still have a day or so in the future I must devote to paring down the digital clutter. Digital clutter, it seems to me, is much worse than the physical type, since you don't see it and it overwhelms your computer before you know it. More than once everything has frozen up due to space issues, and I've frantically had to transfer things over and cross my fingers that I wasn't loosing anything.

That said, I've dug into the external hard drive storage to unearth some of my favorite food photos from each month of 2009. Since I started blogging in April, I have quite an online collection of photos both here and on flickr. The ones below are of die hard obsessions, and are compositions that appealed to me, if not to the larger photographic community.

Off we go:
JANUARY


Granola from Artisan Bread in Five Minutes a Day.

Granola is absolutely an obsession with me, and its one that appears to have no waning in sight as we enter a new decade. Of the many varieties that I've tried and tweaked and eaten (I can not imagine the pounds of rolled oats I've eaten this year...) this one is still one of my most favorite. In fact, I made a batch today, in spite of the lack of freezer space. In addition to being obsessed with granola, I am obsessed with frozen granola. I love it mixed in with day-old oatmeal, sprinkled on top of a Wheatabix biscuit, sprinkled on ice cream or poured directly into my mouth from a ramekin. You really must try it.

FEBRUARY

Dorie Greenspan's Cupcake.

Yes, it is the same as the banner cupcake above. I made them for a Super Bowl party, which is ironic since the thing I love most in the culinary world is chocolate cake, and the thing I hate most would have to be football. I forgot that I took quite a few different shots of this ganache topped beauty, and I like how it appears that I was shooting in a glamorous white facility somewhere and not on my sunlit dining room table. I'm pretty sure I ate a lot of them myself, and like I've said before, it is truly a miracle I am able to maintain my current weight.

MARCH


Nigella Lawson's Chocolate Granola.

I went through a DVRing craze of watching Nigella on Food Network near the end of last winter. While I can't say I've watched much Food TV lately, I guess when the holidays are over and the rush of January is gone, and the whole of winter and snow seems to be beating me into couch potato-ing submission, I do catch up on DVR'd obsessions. As I recall, I was also watching all of the Jamie Oliver's I had recorded as well - so I must have been feeling rather British at the time.

This granola
is so different than any of the others I've tried, and has the benefit of being the recipe to introduce me to brown rice syrup, which is seriously one of my favorite things. It's so good and not so sweet, and has the best crunch of any I've tried.

APRIL

Eggs.

I started the blog this month, and it was just a couple weeks after unexpectedly loosing one of my uncles, who was quite young. I think a great silence fell over me, since though I was far away from him, I remembered him so well from when I was small - and my brother and I were regularly (and gladly) tormented by all of my Mom's brothers (she had 4!). He had such a natural ability to be funny. Not just funny - an incredible wit that goes unmatched to anyone I've ever met. I like to think that the Northwoods are missing the laughter that he brought to everyone who knew him.

Eggs will forever remind me of this, and for a good reason. They do embody the necessity and the circle of life. It seems like a cruel truth, until closer observation. There is such joy to be found in every part. God has given us this set clock to which all of us are bound, and there is no escaping it. Whatever you believe, "When the game is over, all the pieces go back into the same box" as a fortune cookie I had once said.

While it seems like a strange way of coping with something so unexpected, eggs for a week in April did help me, though I felt in no way able to help my family as much as I would have liked to.
MAY

Alton's English Muffins.

My boys went to Chicago, and I stayed behind to catch up on knitting and being alone. Of course, this found time led me to do some rare shopping and I bought some egg rings. (Read more about it here.) It took me three tries to get them to turn out properly, but they were very tasty and ready for their photo op...

JUNE

Black Beans.

I think this is just a random picture from one dinner one night back in June... before I was aware that I would be obsessed with Rancho Gordo, I'm sure these were just regular Non-Gordo's. I am always amazed at the agriculture in our country, and that even if you are short on cash, you can step into any supermarket and buy a pound of beans for about $ .99. These were mostlikely from the bulk bin at my food co-op, so they may have cost slightly more.

I took this
related picture in November (with a Rancho Gordo variety), and one of my favorite flickr contacts left the nicest comments aboutthe respect due a black bean... you'll have to click over and read it.

JULY

Mango Salsa.

My first post back in April was about mangoes and mango salsa. I think I ate mango salsa or a mango crisp for so long that the last time I bought one I made it into salsa and then couldn't even eat it! This never happens to me very often, but I think a new category has emerged: Foods I'm Tired Of. They still are amazing, and I wouldn't want to offend any mangoes who happen to be reading this. I'm pretty sure it's just a phase, and maybe by next June, I'll be ready to devour them once again.

AUGUST


Apples.

In a Saveur article from this fall, I read about a "real life Johnny Appleseed". I never gave so much thought to the "American-ness" of apples before reading this article, and having it explain how there are so many unique American varieties due to the unique way that apple trees are propagated. I think that each tree must then taste unique to itself, since that is why this sauce is the exact taste that comes to mind when I think of applesauce, since I've been eating it pretty much since birth.

The applesauce I made above was from my Gram's tree in Northern Wisconsin. I don't know the variety, but it is sweet and tart. I didn't add any sugar to it at all - and if you'd ask the Boy-O, I know he'd agree that it is plenty sweet. I had a great time being a whole season canner this summer, and looking back at all of the photos I have of my processing, reminds me of this everyday miracle of food preservation.
SEPTEMBER


I am indeed still looking for someone to eat beets with, since this batch of fine looking noodles is still snuggled in the frozen depths of my deep freeze... I just haven't had the occasion to serve them. I may just have to invite a new food blogger friend over to indulge with me...

OCTOBER

Tostadas de Salmon Ahumado and Rancho Gordo Christmas Limas.

Mostly Foodstuff's Majestic and Moist Honeycake

There are three photos for October, since I couldn't choose. GOP turned my eye to the amazing Rancho Gordo in October, and I am forever grateful. Sometimes, there is this thing called "perceived value" which can be an inflated idea of greatness that you inflict on something you really want to be wonderful.

But, dear reader, Rancho Gordo is not included in this definition.The day I placed my first order, I made the delicious smoked salmon tostadas, and the first cooking experience with said beans was this amazing Christmas Lima. They were so good, and only improved with refrigerated residence. I have the other half pound from this batch, and am going to have to make the same meal again.

And as for the cake, well this cake, is the cake of all cakes... at least for a cake lover such as myself. It is so wonderful, and only more complemented by Deena's post about it. I'll say no more, you must try it for yourself. Just look at it gleaming there, you know you need to turn on the oven and brew yourself a pot of coffee...

NOVEMBER

Turkey Sandwich with Spicy Dilly Beans.

This was a great use of the little bit of leftover smoked Thanksgiving turkey. These dilly beans are going to be a staple at my house from now on. I could easily eat as many of them as an actual side of vegetable instead of the one of a pickle that it actually is. It's spicy, and dilly: It's Foodinjars Spicy Dilly Beans! And by all means add that extra cayenne pepper.

DECEMBER

I come from a teetotaling family, so the making of homemade hooch wasn't exactly the first thing that came to mind when I was completely obsessed with tart cherries this last July. Curiosity, however, is the mother of experimentation over here at Casa RCakewalk...

I poured a tiny little cordial cup the other day to see how it was coming along, since the recipe I used suggested letting it rest for several months. It's very sweet, I'll say that, but it's also very cherry. I'm for sure going to have to make a black forest type ice cream, I know this much. It also, strangely, didn't seem overtly strong - but I think the sugar was fooling me. At any rate, it made a very nice picture for the end of the year.

So, at year end, thank you to my small handful of loyal readers that inspire me to continue taking photos and ruminating on life (usually as it pertains to the kitchen) around my house. I've had more fun doing this than I ever thought, and I've met some interesting people who are amazing canners, cooks and bakers! It does seem like the year has evaporated on me once again, and sometimes I wish I could just put the lid on it to slow the process. But then I remember the eggs, and realize that it is all a part of the plan,and that each of these 3 grey hairs I recently noticed are par for the course.


Happy New Year!!!